Sunday, December 27, 2020

My Vagrant fork of Oracle Fleet Patching and provisioning (FPP)


Intro

I have been asked to read about Oracle database fleet management at work but the turnoff was that it relied entirely on OEM. Aggregating both functionalities makes provisioning, in my opinion, cumbersome and unattractive for shops that only want to manage the fleet. Luckily for me, I got acquainted with an even better framework that’s dedicated to manage the provisioning and patching of fleets of targets (DBs & Grids). It’s called Fleet Provisioning and Patching (formerly Rapid Home Provisioning).

Keep my GitHub repo close before reading further : https://github.com/brokedba/OracleFPP

Advantages :

  • Seamless provisioning, patching, and upgrading
  • Agile (less code, out of place deployment, Zero downtime support ie : Goldengate/DG)
  • Increases automation and less heavy to implement (reduced technical debt)
  • Doesn’t rely on OEM (only Grid) nor require an EM license (free with RAC/[One-node])

To my surprise, I assimilated more in an hour of reading FPP than days spent digging on Database fleet Documentation.

When Oracle FPP meets Vagrant\VirtualBox

By the end of 2019, Oracle did the perfect move by making FPP framework accessible to the community through virtualbox. A new vagrant build was added to their vagrant projects in Github and now, with a simple “vagrant up you can try FPP on your own laptop. The build was created by Ruggero Citton from RACPack/MAA team and allows either of the below setups:

  1. Setup an Oracle FPP Server and (Optional) FPP Target on host-only (private) Virtualbox network
  2. Setup an Oracle FPP Server (only) on public network (to be used with targets on your own network).  

Note: Beside VirtualBox, the build also includes support for libvirt KVM provider      

What’s in it for you with my fork

I was supper excited to test FPP using my favorite devops tools, so I deployed the lab and succeeded to run few tasks like importing 19c database and grid software images, creating working copies, and adding a database using rhctl command.
But what if my environment has only 12c Oracle homes? how could I leverage this FPP lab to manage a 12c fleet ?  

For this reason and after few exchanges in GitHub, I decided to create a GitHub fork build that includes scenarios proper to 12c Oracle Homes where one could

  • Import an image from an existing 12c database home to the FPP server and do some patching tests
  • Upgrade from an existing 12 target db home to a 19c working copy
  • Anything else that can be tried with a 12c database home using FPP

Build details

Although all of the content is available on Github’s Read.me Page , I will try to share the relevant part in this article to add more context to the reader. 

1. Disk space requirement

  • Software zipped binaries for 19c Grid , 19c & 12c Database  under "./ORCL_software": ~8.3 Gb.
  • FPP server : 2 OS  vdisks (should be 1 but original vagrantfile has 2) => actual size :  ~2 Gb (max 50)
  • FPP server : Grid Infrastructure on fpps_u01 vdisk  =>  actual size : 12GB  (max 100)
  • FPP server : 6x shared  asm vdisks  =>  actual size : ~40GB  (max 60)

    Below storage needed if host 2 and 12c database are deployed  

  • FPP target : 2 OS  vdisks (should be 1)  => actual size :  ~6 Gb (max 50)
  • FPP target : fppc_u01 vdisk for working copies => actual size : ~13GB (max 100)
  • FPP target : I added fppc_u02 vdisk  for existing 12 database oradata  => actual size : ~5GB (max 100)

   Total space with an existing 12c database and 19c working copy in the FPP target, along with two images on the FPP server
    is  ~78GB

2. Memory

  The minimum required is 18GB (12 for the FPP server and 6 for the FPP target). Consider 12 only if the target is not deployed.

3. The expecting Oracle software


Customization

You can customize the environment by editing the parameters in the configuration file:"vagrant.yml" but there is another file that holds the core configuration of our vagrant build which is "Vagrantfile"

What I changed

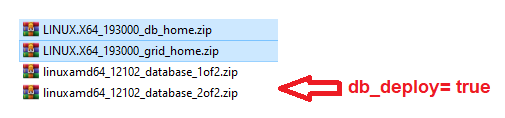
  • I added 2 scripts that will deploy a 12c database if db_deploy=true in the FPP target

    ./scripts/13_Setup_db.sh
    ./scripts/oracle-rdbms.service

  • Adapted the VagrantFile to add a disk for the 12c datafiles (oradata) in the FPP target 

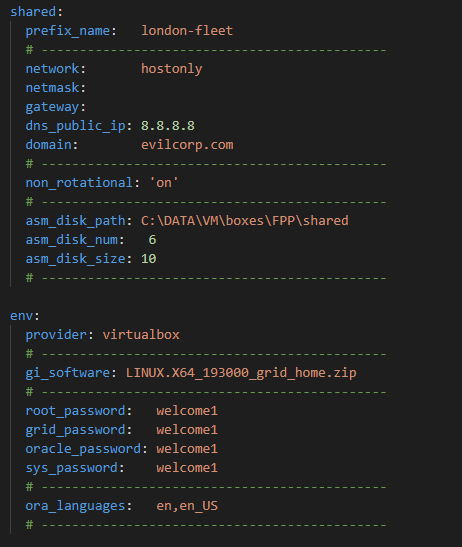
- The following is a sample of  vagrant.yml and its customizable parameters (default)

 image

Note: All host2 parameters that come after “deploy: true” were added by me in order to allow an optional DB deployment

- If you scroll further, you will see two remaining sections that contain few shared network and FPP environment parameters

fpp_vagrant_yml.png

All descriptions can be found >>here

Getting started

  1. Clone my Repository : git clone https://github.com/brokedba/OracleFPP.git
  2. Download and move the binaries under clone_path/OracleFPP/ORCL_software
  3. cd into the cloned directory : cd clone_path/OracleFPP
  4. Run  "vagrant up" and let the magic happen
  5. Log into either FPP-server [vagrant ssh host1 ] or FPP-target [vagrant ssh host2]


FPP examples

Now that the vagrant build is deployed you can start running few commands depending on the scenario you choose.
Having limited resource you may want setup the following JAVA env variables for grid user before rhpctl commands executions:
export JVM_ARGS="-Xms512m -Xmx512m" and export _JAVA_OPTIONS="-XX:ParallelGCThreads=2"

Here are few tasks I tried myself :

1. Import Database image

[grid@fpp-S]$ rhpctl import image -image db_19300 -imagetype ORACLEDBSOFTWARE -zip /vagrant/ORCL_software/LINUX.X64_193000_db_home.zip

QUERY IMAGE
============

[grid@fpp-Server ~]$ rhpctl query image -image db_19300
   Picked up _JAVA_OPTIONS: -XX:ParallelGCThreads=2
   fpp-Server.evilcorp.com: Audit ID: 3
   Image name: db_19300
   Owner: grid@london-fleet-c
   Site: london-fleet-c
   Access control: USER:grid@london-fleet-c
   Access control: ROLE:OTHER
   Access control: ROLE:GH_IMG_PUBLISH
   Access control: ROLE:GH_IMG_ADMIN
   Access control: ROLE:GH_IMG_VISIBILITY
   Parent Image:
   Software home path: /rhp_storage/images/idb_19300208165/.ACFS/snaps/idb_19300/swhome
   Image state: PUBLISHED
   Image size: 6536 Megabytes
   Image Type: ORACLEDBSOFTWARE            <<----
   Image Version: 19.0.0.0.0:19.3.0.0.0    <<----
Groups configured in the image: OSDBA=dba,OSOPER=oper,OSBACKUP=backupdba,OSDG=dgdba,OSKM=kmdba,OSRAC=racdba
   Image platform: Linux_AMD64
   Interim patches installed: 29585399,29517242
   Contains a non-rolling patch: FALSE
   Complete: TRUE


2. Import GRID Image

[grid@fpp-S]$ rhpctl import image -image gi_19300 -imagetype ORACLEGISOFTWARE -zip /vagrant/ORCL_software/LINUX.X64_193000_grid_home.zip

QUERY IMAGE
============

[grid@fpp-Server ~]$ rhpctl query image -image gi_19300
  Picked up _JAVA_OPTIONS: -XX:ParallelGCThreads=2
  fpp-Server.evilcorp.com: Audit ID: 5
  Image name: gi_19300
  Owner: grid@london-fleet-c
  Site: london-fleet-c
  Access control: USER:grid@london-fleet-c
  Access control: ROLE:OTHER
  Access control: ROLE:GH_IMG_PUBLISH
  Access control: ROLE:GH_IMG_ADMIN
  Access control: ROLE:GH_IMG_VISIBILITY
  Parent Image:
  Software home path: /rhp_storage/images/igi_19300182669/.ACFS/snaps/igi_19300/swhome
  Image state: PUBLISHED
  Image size: 6032 Megabytes
  Image Type: ORACLEGISOFTWARE   <<----
  Image Version: 19.0.0.0.0:19.3.0.0.0   <<-----
  Groups configured in the image: OSDBA=dba,OSASM=dba,OSBACKUP=dba,OSDG=dba,OSKM=dba,OSRAC=dba
  Image platform: Linux_AMD64
  Interim patches installed: 29585399,29517247,29517242,29401763
  Contains a non-rolling patch: FALSE
  Complete: TRUE


3. Import existing 12c DB_HOME:

   This one is a bit tricky as rhpctl relies on nfs to do the job and it wasn’t enabled by default in the original build.
   I’ll update the setup script so you won’t have to start the nfs service manually.

# Setup update
# systemctl enable/start nfs-server

[grid@fpp-S]$ rhpctl import image -image db_12102 -imagetype ORACLEDBSOFTWARE -path /u01/app/oracle/product/12.1.0.2/dbhome_1 -targetnode fpp-Client -root
  Enter user "root" password:xxxx

QUERY IMAGE
============

[grid@fpp-Server ~]$ rhpctl query image -image db_12102
  fpp-Server.evilcorp.com: Audit ID: 17
  Image name: db_12102
  Owner: grid@london-fleet-c
  Site: london-fleet-c
  Access control: USER:grid@london-fleet-c
  Access control: ROLE:OTHER
  Access control: ROLE:GH_IMG_PUBLISH
  Access control: ROLE:GH_IMG_ADMIN
  Access control: ROLE:GH_IMG_VISIBILITY
  Parent Image:
  Software home path: /rhp_storage/images/idb_12102399207/swhome
  Image state: PUBLISHED
  Image size: 5320 Megabytes
  Image Type: ORACLEDBSOFTWARE
  Image Version: 12.1.0.2.0
  Groups configured in the image: OSDBA=dba,OSBACKUP=dba,OSDG=dba,OSKM=dba
  Image platform: Linux_AMD64
  Interim patches installed:
  Contains a non-rolling patch: FALSE
  Complete: TRUE


4. UPGRADE a 12c DB to 19c in one command

   FPP can’t upgrade a non-CDB to PDB (uses DBUA). That being said, I had a successful CDB upgrade
   with 100% completion but a warning that wasn’t impactful .

  • Provision the 19c working copy

[grid]$ rhpctl add workingcopy -workingcopy wc_db_19300 -image db_19300 -user oracle -groups OSBACKUP=dba,OSDG=dba,OSKM=dba,OSRAC=dba -oraclebase /u01/app/oracle -path /u01/app/oracle/product/19.0.0/dbhome_1 -targetnode fpp-Client -root
Enter user "root" password:xxxx

  • Upgrade 12c cdb1 to 19c

[grid]$ rhpctl upgrade database -dbname cdb1 -sourcehome /u01/app/oracle/product/12.1.0.2/dbhome_1  -destwc wc_db_19300 -targetnode fpp-Client -root

Enter user "root" password:xxxx
...

100% complete

fpp-Server.evilcorp.com: Completed the upgrade database operation

SQL> @check_pdb

PDB_ID PDB_NAME  STATUS
------- --------- --------
2 PDB$SEED  NORMAL
3 PDB1     NORMAL

NAME      OPEN_MODE  RES  PDB_COUNT LOCAL_UNDO  TOTAL_MB BLOCK_SIZE
--------- ---------- --- ---------- ---------- ---------- ----------
PDB$SEED  READ ONLY  NO       0          0       1160       8192
PDB1      READ WRITE NO       0          0       1122       8192

$ Lsnrctl status

LSNRCTL for Linux: Version 19.0.0.0.0 - Production on 09-NOV-2020 15:58:15
Service "pdb1" has 1 instance(s).
  Instance "cdb1", status READY, has 1 handler(s) for this service...


CONCLUSION

There is only so much we can talk about in a blog post but I hope this will encourage you to try it yourself. In case you want to know more about the available use cases for FPP please have a look at the below links :

Documentation can sometime be unclear which led me to reach out to Oracle MAA team about this. The good thing is that it’ll help me build a little FAQ based on their output around FFP concepts… but that’ll be a topic for my next article;), Stay tuned.

Thank you for reading

Friday, December 25, 2020

The not so AUTO ...UPGRADE ! (ORACLE Autoupgrade in Windows )

This image has an empty alt attribute; its file name is image-3.png

Intro

First, before anyone starts sending me print screens about their successful Autoupgrade, or flexing about how their 100+ databases were smoothly migrated to PDBs over the weekend, I am stopping you right there. This is my honest feedback on the experience I had when trying the tool on a windows environment. It is obviously not a rant but could have been after 2 lonesome and painful months of sheer struggle with Oracle support. I had even shared the issues I went through with the community in twitter but I just happened to be the lucky one to have hit that special Bug. There are enough blog posts showing you the glamourous side of Autoupgrade, let me introduce you... the Hitchcockian version.

The Plot 

It all started last summer when my client, whom had Oracle Standard edition databases all over his windows fleet, asked about available approaches and downtime to migrate Peoplesoft DBs from 12c (non CDB)  to 19c multitenant architecture. At that time, Autoupgrade hype was still kicking and I’d watched all recordings of Mike Dietrich. Although most examples were based on Linux I felt confident it’ll be a piece of cake on windows too (never trust the hype) and sold that to my client.  

My environment :

PlatformSource non CDB database SITarget CDB SIHypervisor      Application
Windows server 201212.1.0.2 Standard Edition19.7.0.0 Standard Edition Yes (Vmware) Peoplesoft 9.2


Why Choose AutoUpgrade
 

Beside the glaring fact that Oracle strongly recommends it as the best way to upgrade databases to 19c I have also explored available alleys before choosing AU.
According to Oracle 19c migration white paper, below are the few methods available to upgrade or migrate to 19c databases

This image has an empty alt attribute; its file name is image-4.png

In my case, I needed to migrate & convert a 12c non CDB to a 19c PDB and since Full transportable tablespaces weren’t supported on Standard edition, the remaining options were:

- DBUA ==> Doesn’t seem to support NonCDB to PDB conversion (also resume after failure is not possible)
- dbupgrade ==> Not enough automated (heck, we’re in 2020)
- Datapump expdp/impdp ==> Gigantic downtime when tested with the database that was ~1TB and 80k+ tables worth 
 

The journey into BUG land

Autoupgrade option being selected, I was very exited to perform it in a real project as opposed to doing it on a vagrant lab. I started by installing the target 19c Software and patched it to 19.7 before creating a CDB using dbca, all was going as planned.

First Attempt

I decided to do POC with a production refresh using rman duplicate and then upgrade the whole thing but out of the blue, right at the finish line (95% upgrade completion) the Autoupgrade crashed on me.

The Configuration

-  Autoupgrade Config file is pretty basic as you can see below with restoration set to no

# Upgrade 1
global.autoupg_log_dir=D:\19c\AutoUpgrade\aupg_logs
upg1.dbname=FSDB
upg1.start_time=NOW
upg1.source_home=C:\Oracle\product\12.1.0.2.0\dbhome
upg1.target_home=C:\Oracle\product\19.0.0\db_home1
upg1.sid=FSDB
upg1.log_dir=D:\Backup\19c\AutoUpgrade\aupg_logs\FSDB
upg1.upgrade_node=DEVHOST # sanitized
upg1.target_version=19.7
upg1.target_cdb=CDBTEST # sanitized
upg1.target_pdb_name=FSPDB
upg1.run_utlrp=yes
upg1.source_tns_admin_dir=C:\Oracle\product\12.1.0.2.0\dbhome\network\admin
upg1.timezone_upg=yes
upg1.restoration=no   # Standard edition doesn’t support guaranteed restore points


THE STEPS

The following steps were ran while none of ORACLE_SID and ORACLE_HOME environment variables were set (important)

19c jdk              autoupgrade.jar
1.8.0_201Build.version 19.9.2  - 2020/08/31


1. Autoupgrade analyze

C:\> java -jar autoupgrade.jar -config UP19_FSDB.cfg -mode analyze

The only reported preupgrade errors where due to a non empty Recycle bin and the presence of 2 deprecated parameters but both had fixups which I decided to perform manually anyway.  

This image has an empty alt attribute; its file name is image-5.png

2. Autoupgrade deploy

The environment was ready for a go so I launched the deploy phase

C:\> java -jar autoupgrade.jar -config UP19_FSDB.cfg -mode deploy
... An hour later
upg> lsj
+----+-------+---------+---------+-------+--------------+--------+------------+
|Job#|DB_NAME| STAGE |OPERATION| STATUS| START_TIME | UPDATED| MESSAGE |
+----+-------+---------+---------+-------+--------------+--------+------------+
| 107| FSDB |DBUPGRADE|EXECUTING|RUNNING|20/09/11 12:33|19:25:12|93%Upgraded |
+----+-------+---------+---------+-------+--------------+--------+------------+
upg>
----------------------------------------------
Errors in database [FSDB] Stage [DBUPGRADE]
Operation [STOPPED] Status [ERROR]
Info [ Error: UPG-1400 UPGRADE FAILED [FSUAT]
Cause: Database upgrade failed with errors

The upgrade phase never finished but half the catalog was upgraded while 2 components became invalid (hybrid 12/19c DB)
Image


ERRORS

I will break down the errors into 3 categories according to the component they are linked to

1. AUD$ table & DBA_AUDIT_TRAIL

The first set of errors stemmed from two missing columns on sys.aud$ but let’s first see what exactly happened

DATABASE NAME: FSDB
CAUSE: ERROR at Line 6156 in [D:\..\FSDB\FSDB\107\dbupgrade\catupgrdxxfsdb1.log]
        REASON: ORA-00904: "CURRENT_USER": invalid identifier
        ACTION: [MANUAL]
2020-09-16 20:52:19.585 ERROR
CAUSE: ERROR at Line 6281 in [D:\..\FSDB\FSDB\107\dbupgrade\catupgrdxxfsdb1.log]
        REASON: ORA-00904: "RLS_INFO": invalid identifier
        ACTION: [MANUAL]    


In the catupgrdfsdb0.log, the lines show that both current_user and rls$info columns were added to sys.aud$ at first. But few minutes later, the same columns magically vanished which made the 19c cataudit.sql (called by catalog.sql) script fail when recreating DBA_AUDIT_TRAIL view that’s based on aud$  

Image

How can this be? adding columns to a table just to see them vanish few minutes later with no other ddl run on that table !

           >> Fast forward 2 months and 7 MOS engineers later <<   (yes.. it hurts) 

Granny Fight GIF - KungFuPanda3 Training Slow GIFs

Explanation

The AUD$ table was actually under ADM schema and not SYS (sys.aud$ was just a synonym). But why on earth adding columns on sys.aud$ synonym didn’t raise any error (i.e ORA-00942). If we can’t run a ddl through a synonym, then an exception should be expected.

SQL> select owner, object_name, object_type from dba_objects where object_name='AUD$';
OWNER OBJECT_NAME OBJECT_TYPE
---- ------------- ------------
SYS AUD$ SYNONYM
ADM AUD$ TABLE

ADM (SYSADM): Is what we call in Peoplesoft the administrative schema(Owner ID) which contains nearly all of the database objects and is used by PeopleSoft application to control schema objects access. 

Solution 

The fix that took 2 months to figure out was to add the columns directly to ADM.aud$ table before the autoupgrade

SQL> alter table adm.aud$ add rls$info clob;
SQL> alter table adm.aud$ add current_user varchar2(128);


2. CATJAVA

This issue was solved very early in the SR as the error is likely due to the missing XDK component which JAVA depends on. Note that source production database(12c) didn’t have XDK and java wasn’t used neither.

Image

Solution 

Install Oracle XDK and recompile invalid objects before the Autoupgrade as shown below

SQL> @?\xdk\admin\initxml.sql

SQL> @?\admin\utlrp.sql


3. DBMS_REGISTRY.TIMESTAMP not found

TIME_STAMP function had moved to dbms_registry_sys package sometime back and the internal cdend.sql script  is still referring the old statement package. Even if it is only a failed select statement it will still block the upgrade.

This image has an empty alt attribute; its file name is image-6.png

Solution

Replace the called function with the right package in the 19c catalog script (?\admin\cdend.sql) and resume the autoupgrade

-- Replace the below line
SELECT dbms_registry.time_stamp('CATALOG') AS timestamp FROM DUAL;
-- By this one
SELECT dbms_registry_sys.time_stamp('CATALOG') AS timestamp FROM DUAL;

Important : Don’t hesitate to  run the utlrp.sql after making changes before starting/resuming the Autoupgrade as you can always have invalid objects lingering that can block the upgrade (see below ) 

REASON: ORA-04063: package body "SYS.DBMS_REGISTRY_SYS" has errors


CONCLUSION

I wanted to share my experience so peers in the same situation won’t have to struggle with the support for months to get their databases upgraded in windows using a tool that is supposed to be an industry standard. Make no mistake, I love that I can leverage native automation for my DBA tasks but I just don’t call something AUTO when you have to add manual corrections to resolve undocumented bugs just because it’s windows. Being a beta tester is never fun but we can agree that Autoupgrade has room for improvement.
At last, it always feels good to see a successful output after too many failures

This image has an empty alt attribute; its file name is autoupgrade_job.png
   
Thanks for reading  

Sunday, December 20, 2020

Convert local listeners to Oracle Grid managed listeners


Intro

One of the advantages of Oracle grid Infrastructure is to restart all managed resources (databases, asm, listeners,…etc)  automatically whenever you (re)start the cluster service (crs) or reboot the whole server.

I recently had to patch an oda where the client still had few listeners (with non default ports) managed locally and not through grid. This means that anytime there is maintenance or a reboot those listeners would require a manual restart. I ,hence, needed to convert them into Clusterware resources so we wouldn’t worry about restarting them manually after the patch.

Downtime? 

Existing connections won’t be interrupted but new connections will wait for the database services to register back to the new listeners recreated in the Clusterware as the old ones will be stopped during the process. We obviously can’t add a listener when another listener is running with the same port.  


Use case

This was done on a single node ODA where single instance databases were deployed but still managed by the grid infrastructure software. There were 3 listeners(1522,1523,1524) defined with a non default port and a couple of instance configured to be registered to those listeners.

Service registration

The mentioned instances services were registered to the non default listeners using local_listener parameter. Normally, you don't have to set listener parameters, neither local_listener nor remote_listener because the background process LREG will register services with the default local and remote 1521 listener automatically. With a different port,however, local_listener must be set to point to the listeners’ addresses (i.e port 1522).

- In my case each of the instances had the local_listener set to a similar entry to the below, depending on the port.

SQL>  show parameter local_listener
NAME                                 TYPE        VALUE
------------------------------------ ----------- --------------------------------------
local_listener                       string      (ADDRESS=(PROTOCOL=TCP)(HOST=odaprd1)
(PORT=1522))

Note: You can also resolve the LOCAL_LISTENER address to a listener alias defined in the tnsnames file on the database host

THE STEPS :
 Below steps were ran as grid user but in case of  a single ownership (oracle user) for grid and database software you can use oracle.

1. Backup  the existing listener file

[grid@odaprd] cp $GRID_HOME/network/admin/listener.ora ~/listener.ora.bkp

2. Stop the listeners in question

[grid@odaprd1]$ export ORACLE_HOME=/u01/app/18.0.0.0/grid
[grid@odaprd1]$ lsnrctl stop LISTENER_1522
[grid@odaprd1]$ lsnrctl stop LISTENER_1523
[grid@odaprd1]$ lsnrctl stop LISTENER_1524

3. Edit the listener file

[grid@odaprd] vi $ORACLE_HOME/network/admin/listener.ora

Delete the entries related to the listeners we stopped to avoid conflicts with the ones created via srvctl add listener

LISTENER_1522=(DESCRIPTION_LIST=...
ENABLE_GLOBAL_DYNAMIC_ENDPOINT_LISTENER_1522=ON

...
LISTENER_1523=(DESCRIPTION_LIST=...
ENABLE_GLOBAL_DYNAMIC_ENDPOINT_LISTENER_1523=ON
...
LISTENER_1524=(DESCRIPTION_LIST=...
ENABLE_GLOBAL_DYNAMIC_ENDPOINT_LISTENER_1524=ON


4. Add the listeners resources in the crs

Now we can add the listeners at clusterware level. Note that -p argument is likely deprecated and replaced with –endpoints 

[grid@odaprd] srvctl add listener -l LISTENER_1522 -o /u01/app/18.0.0.0/grid -p 1522
[grid@odaprd] srvctl add listener -l LISTENER_1523 -o /u01/app/18.0.0.0/grid -p 1523
[grid@odaprd] srvctl add listener -l LISTENER_1524 -o /u01/app/18.0.0.0/grid -p 1524

5.  Confirm that the changes are now effective

There are few ways to verify the status of the newly created listeners. lsnrctl status is one of them and will show the database services that were initially registered to the previous local listeners. The status can also be checked using srvctl  


[grid@odaprd] srvctl status listener -l LISTENER_1522
Listener LISTENER_1522 is enabled
Listener LISTENER_1524 is running on node(s): odaprd

[grid@odaprd] srvctl status listener -l LISTENER_1523
Listener LISTENER_1523 is enabled
Listener LISTENER_1523 is running on node(s): odaprd

[grid@odaprd] srvctl status listener -l LISTENER_1524
Listener LISTENER_1524 is enabled
Listener LISTENER_1524 is running on node(s): odaprd

Or you can run Fred Denis’ famous rac-cluster.sh script that shows you the graphical display of your grid resources

[grid@odaprd] ./rac-status.sh -e

This image has an empty alt attribute; its file name is image-1.png

Conclusion

It is very easy to move existing listeners defined with non default ports to the clusterware as long as the local_listener parameter is defined. Although I haven’t tried to run srvctl add listener without pre-emptively removing the old entries defined the listener.ora but I am pretty sure that would lead to a conflict and would trigger an error.


Friday, December 18, 2020

Add SCAN VIPs to Oracle RAC with zero “listener” downtime


Intro

Infrastructure teams are usually more keen to maintain a network stability rather than altering their existing configuration every other day.This means that once the application and database hosts are provisioned and running, the DBA won't witness a topology change unless a migration of the servers/applications are in the pipes. But for highly available environment like Oracle RAC, the DBA’s help can still be required when the network changes impact the related clusterware resources.

In my case my client had a RAC one Node database in an ODA with only one scan IP address (don’t ask me why) which made the whole environment a bit too shaky. Hence the DNS configuration had to add another IP for SCAN entry

What would be the downtime in order to update RAC with a newly added scan VIP in the DNS server? 

The short answer is “0”, but I needed to refresh my memory, so I checked few resources and articles online but all of them were mentioning a mandatory stop/start for both scan and scan listener during the change.
My guts were telling otherwise as I remember that some srvctl modify commands could apply changes online. In this particular case, as long as you are not changing the IP address/port of an existing SCAN[listener] there is no need to stop anything.

To see how it works, I did a test in a two node RAC Cluster lab but it works the same on a RAC-One node.


Check the 3rd VIP added in the DNS server

$ nslookup  ecl-oda-scan
Server: 10.10.2.2
Address: 10.10.2.2#53
Name: ecl-oda-scan.evilcorp.com
Address: 10.10.30.49, Address: 10.10.30.48,Address: 10.10.30.50 <== added IP

Check the existing scan configuration in the cluster

$ srvctl config scan
SCAN name: ecl-oda-scan, Network: 1
Subnet IPv4: 10.10.30.0/255.255.255.0/bond0, static
SCAN 1 IPv4 VIP: 10.10.30.49
SCAN VIP is enabled.
SCAN 2 IPv4 VIP: 10.10.30.48
SCAN VIP is enabled
$ srvctl status scan_listener
SCAN listener LISTENER_SCAN1 is running on node ecl-oda-0
SCAN listener LISTENER_SCAN2 is running on node ecl-oda-1


Check the existing scan listener configuration in the cluster

$ srvctl config  scan_listener
SCAN Listeners for network 1:
Registration invited nodes:
Registration invited subnets:
Endpoints: TCP:1521
SCAN Listener LISTENER_SCAN1 exists and enabled
SCAN Listener LISTENER_SCAN2 exists and enabled
$ srvctl status scan_listener
SCAN listener LISTENER_SCAN1 is running on node ecl-oda-0
SCAN listener LISTENER_SCAN2 is running on node ecl-oda-1

 Note:  Now we can start updating the change at clusterware level.


1. Run srvctl modify scan command to create additional SCAN VIP resources

There’s no need to stop/restart the existing scan resources since we just added a new scan VIP in the DNS zones  

$ srvctl modify scan -scanname ecl-oda-scan  

$ srvctl config scan
SCAN name: ecl-oda-scan, Network: 1
Subnet IPv4: 10.10.30.0/255.255.255.0/bond0, static
SCAN 1 IPv4 VIP: 10.10.30.49
SCAN VIP is enabled.
SCAN 2 IPv4 VIP: 10.10.30.48
SCAN VIP is enabled

SCAN 3 IPv4 VIP: 10.10.30.50
SCAN VIP is enabled.
$ srvctl status  scan
SCAN VIP scan1 is enabled
SCAN VIP scan1 is running on node ecl-oda-0
SCAN VIP scan2 is enabled
SCAN VIP scan2 is running on node ecl-oda-1
SCAN VIP scan3 is enabled
SCAN VIP scan3 is not running


2. Create Oracle Clusterware resource for the additional SCAN listener to go with the additional SCAN VIP  

Here again, no need to stop any of the existing scan listeners first

$ srvctl modify scan_listener -update
$ srvctl status  scan_listener
SCAN Listener LISTENER_SCAN1 is enabled
SCAN listener LISTENER_SCAN1 is running on node ecl-oda-0
SCAN Listener LISTENER_SCAN2 is enabled
SCAN listener LISTENER_SCAN2 is running on node ecl-oda-1
SCAN Listener LISTENER_SCAN3 is enabled
SCAN listener LISTENER_SCAN3 is not running


3. Start the 3rd scan resource added to the clusterware 

The trick is to only start the added scan by using the scan number as argument

Syntax (19c)
  srvctl start scan [-scannumber ordinal_number] [-node node_name]

$ srvctl start scan -scannumber 3
SCAN VIP scan3 is running on node ecl-oda-0
$ srvctl modify scan_listener -update


4. Start the 3rd scan listener resource added to the clusterware 

$ srvctl start scan_listener -i 3
SCAN listener LISTENER_SCAN3 is running on node ecl-oda-0

5. Confirm that the changes are now effective.

$ srvctl status  scan
SCAN VIP scan1 is enabled SCAN VIP scan1 is running on node ecl-oda-0 SCAN VIP scan2 is enabled SCAN VIP scan2 is running on node ecl-oda-1 SCAN VIP scan3 is enabled SCAN VIP scan3 is running on node ecl-oda-0
$ srvctl status scan_listener
SCAN Listener LISTENER_SCAN1 is enabled
SCAN listener LISTENER_SCAN1 is running on node ecl-oda-0
SCAN Listener LISTENER_SCAN2 is enabled
SCAN listener LISTENER_SCAN2 is running on node ecl-oda-1
SCAN Listener LISTENER_SCAN3 is enabled
SCAN listener LISTENER_SCAN3 is running on node ecl-oda-0


Conclusion

This example confirms that not all SCAN modifications require a shutdown of your scan/listener resources. If it’s a new scan VIP that is added then the downtime is equal to zero as the new resources can be started independently (using -scannumber and -i arguments). 
Just make sure you are using the right syntax according to the version of the Grid software you are running :
- 18c

srvctl modify scan –n  [scan_name] 
srvctl modify scan_listener -u

- 19c

srvctl modify scan –scanname [scan_name]
srvctl modify scan_listener -update


Monday, December 14, 2020

Deploy a webserver vm using Azure CLI and bash scripts (Linux/windows)

                                        
Intro

Azure cli was another tool I had to try right after passing Az-900 azure certification, because what are certifications for if it’s not to give a little itching to get your hands a little dirty. Thus, az-cli became my third victim after oci-cli and aws-cli.
As in my previous cli tutorials, the aim is to demonstrate how the CLI tool can enrich your IaC experience when combined with powerful shell scripts. What comes along when you test your third cli tool in a row though, is how easy it is to spot differences with other cloud platforms (expect to see some in this post).

Here’s a direct link to my Github repo with all the scripts: https://github.com/brokedba/az-cli-examples
Here’s also a gif demo to see things in motion: https://bit.ly/3hvTwVu 

I. Bash still rocks

With a little patience and few days debugging bash errors, my interactive scripts can now automate the provisioning of a webserver on 6 different OS (RHEL, Centos, Oracle Linux, Ubuntu, SUSE, Windows server 2016)
In total, 6 interactive BASH scripts & userdata files were used with Windows turning out to be the nastiest to deploy (I’ll explain why). The code also ensures that required network components like subnet or security group are created if missing during the launch. This will hopefully give beginners a glimpse on az-cli capabilities that make it so handy.  
 
A big shout out to Stackoverflow community that made my life easier while bash scripting my way to pull this off.

 
Topology

The following figure shows the layers involved between our workstation and Azure while running the cli commands.

This image has an empty alt attribute; its file name is az-cli_instance-1.png

  CLI setup and assumptions

   If your cli environment is not configured yet, go check my previous post (az-cli installation) it’s very easy.  

   I will assume that the below elements are present/configured in your workstation:

  • ssh key pair to attach to your azure vm. below is the PEM based key pair I generated for this lab
  • $ ssh-keygen -P "" -t rsa -b 2048 -m pem -f ~/id_rsa_az
    Generating public/private rsa key pair.
    Your identification has been saved in /home/brokedba/id_rsa_az.
    Your public key has been saved in /home/brokedba/id_rsa_az.pub.
  • Default output is set to table
  • $  az config set defaults.output=table
    +-----------------------------------------+---------+
    |  Name    | Source                       | Value   | 
    +----------+------------------------------+---------+ 
    | output   | /home/brokedba/.azure/config | table   |
    +----------+------------------------------+---------+
  • Note: The default region used in this lab will depend on your resource group or the configured region parameter 

II. Clone the repository


III. Deployment

  • Before starting the deployment let’s first talk about what makes azure architecture different from other cloud platforms

    Network:

    In Azure every subnet is a public subnet because as soon as you associate a public IP to a Vm’s VNIC, you'll magically have internet access.Thus, the usual internet gateway is not needed here because system routes are taking care of that. Besides the CIDR range in azure is slightly larger than aws ( from /8 to /29).

    ID:
    Azure doesn’t provide regular alpha numeric ids for its resources but a sort of path based identification (see below)
  • $ SUBNET ID  
    /subscriptions/xx/resourceGroups/my_group/providers/Microsoft.Network/virtualNetworks/MY-VNET/subnets/My_SUBNET

    Naming: Naming is
    - Case insensitive (Windows baby ;)!!)     
    - Unique: A resource group can’t have 2 resources of the same type having the same name    

  • Takeaways:
    We can imply from the above that
    1- We won’t need to handle ids but just the resource names in our scripts as they are unique within a resource group
    2- Route table and internet gateway setting will be replaced by the Public IP and VNICs

  1. CREATE A VNET/SUBNET

  • Below script creates both Vnet and Subnet using default or custom values for their names and CIDR block. I also added checks on the IP/CIDR format. You can click on the Script to see the content.
  • Network security group menu will offer to open few ports for you but will also be checked in the vm creation script
    brokedba@ ./create_az_vnet.sh
      Name          Location
    ------------  ---------
    brokedba       eastus
    select the resource Group you wish to set for your resources []:
    Enter the VNET name you wish to create
    [CLI-VPC]: selected VNET name : CLI-VCN
    selected group name: brokedba
    Enter the subnet name you wish to add [CLI-SUB]:
    Enter the VNET CIDR to assign '/8-To-/29' [192.0.0.0/8]: 192.0.0.0/8
    Enter the Subnet CIDR to assign within 192.0.0.0/8 to '/29' [192.168.0.0/16]:

      ==== Created VPC details ==== +---------+------------+---------+--------------+---------------+--------------+ | VNET    | Vnet_CIDR  | Subnet |  SUB_CIDR   | Resource_group| Region | +---------+------------+---------+--------------+---------------+--------------+ | CLI-VNET|192.0.0.0/8 | CLI-SUB |192.168.0.0/16| brokedba    | canadacentral| +---------+------------+---------+--------------+---------------+--------------+ Note: make sure all bytes beyond network prefix length are always zeroed or you'll have an error
    ************ Security Group ! ************
    1) SSH port Only             3) HTTP,RDP, and HTTPS
    2) SSH, HTTP, and HTTPS

    Select a security group ingress rule and press Enter: 2
    ******************* Security Group detail  ******************
    +---------------+---------+-------------------+----------------------------+
    | Name       | Source |   PORT            | Type    | Priority |
    +---------------+---------+-------------------+---------+------------------+
    | Allow-WEB-IN  |Internet | ["22","80","443"] | Inbound |   100 |
    +---------------+---------+-------------------+---------+------------------+


    SG delete command  ==>
    az network vnet delete –g brokedba -n CLI-VNET
    VPC delete command ==> az network nsg delete  -g brokedba -n sg_CLI-SUB_WEB
    Disassociate NSG from its Subnet => az network vnet subnet update --vnet-name CLI-VNET --name CLI-SUB –g brokedba --network-security-group ""

    Note:
    - If no resource group is detected in your account the script will ask you to create one using create_az_rg.sh
    - Delete commands are added in each script so you could destroy/repeat without using the Web Console.


  1. CREATE SUBNET (Optional)

  • You can also create a subnet for an existing vnet using create_az_subnet.sh script but it’ll only allow it if the vnet has no existing subnet (sorry, too much exception handling due to CIDR overlap in case of existing subnets)

  1. LIST VM SIZES (Optional)

  • Below menu returns the available vm sizes per picked vcpu number If you to want to replace the default size defined in the create_az_instance.sh script ( $vm_size)

    brokedba@ ./check_az_vmsize.sh
    ******* azure vm shape Selecta ! ************
    list all vm sizes in eastus region depending on the CPU and Series selected.
    ...>> Pick vm size = CPU#
    1) 1 VCPU
    2) 2 VCPUs
    3) 4 VCPUs
    4) 8 VCPUs
    5)16 VCPUs
    Select a number of cores and press Enter:
    3
    >> Vm compute Series
    1) A Series (Entry-level)              3) D Series (General purpose)
    2) B Series (burstable)               4) E Series (Optimized for in-memory)
    Select a VM series and press Enter: 3
    VM              VCPUS    Memory_MB    MaxDisks   OSDisk_maxMB  UserDisk_maxMB
    --------------- ------ -------------- ----------- ------------- ----------------

    Standard_D4s_v3   4        16384        8           1047552         32768
    Standard_D4_v3    4        16384        8           1047552         102400
    Standard_D4d_v4   4        16384        8           1047552         153600
    Standard_D4_v4    4        16384        8           1047552         0
    Standard_D4ds_v4  4        16384        8           1047552         153600
    Standard_D4s_v4   4        16384        8           1047552         0
    Standard_D4a_v4   4        16384        8           1047552         102400
    Standard_D4as_v4  4        16384        8           1047552         32768

  • Note: Default location is eastus.To change it, modify the variable $location at the top of the script.

  1. LIST IMAGES (Optional)

  • Below menu returns the last available image per OS type. This will help you decide which OS to choose for your vm
    brokedba@ ./check_image.sh 
    ******* AWS Image Selecta ! ************
    Choose your Destiny ||{**}||
    
    1) RHEL          3) Oracle Linux  5) Windows       7) Exit? 
    2) CentOS        4) Ubuntu        6) Suse  
    Select an option and press Enter: 2
    Name   Publisher    Sku         Urn                              Version
    -----  ----------- ------  -----------------------------------  -------------- CentOS  OpenLogic    7.7   OpenLogic:CentOS:7.7:7.7.2020111300  7.7.2020111300

  1. CREATE INSTANCE

  • After running the create Vnet script, we can now launch our new vm using 6 possible OS’ to choose from.
  • The default vm type is “Standard_B1s” but you can give the variable another value if you want.
    You’ll be asked to retry if the Vnet and Subnet names don’t match and if a subnet is missing, it’ll be created for you. 
  • brokedba@ ./create_instance.sh
    ******* Azure VM launch ! ************

    ********** Resource Group ***********
    Name         Location ----------- -----------
    brokedba     eastus

    select the resource Group you wish to set for your resources []: brokedba
    Enter the name of your new Instance [Demo-Cli-Instance]: Demo-vm ----- selected Instance name : Demo-vm Vm size : Standard_B1s
    ********** Network ***********

             **** VNET **** VNET      Vnet_CIDR    Resource_group    Region --------  -----------  --------------- ---------- CLI-VNET  192.0.0.0/8  brokedba       useast select the VNET Name for your new instance []: CLI-VNET selected VNET name : CLI-VNET          

    **** SUBNET *** Subnet    CIDR            ResourceGroup --------  --------------  -------------- CLI-SUB   192.168.0.0/16  brokedba Select The Subnet for your new instance []: CLI-SUB selected subnet name :  CLI-SUB

    Subnet exist => Checking  the OS menu and Security group rules ...

    ************ Network security Security Group ! ************ 
    Checking the associated  NSG : sg_CLI-SUB_WEB
    == Creating the instance with the below NSG.
    { "Combo_rule_Ports": "["22","80","443"]",
      "Name": "sg_CLI-SUB_WEB",
      "resourceGroup": "brokedba",
      "single_rule_Ports": "[]",
      "sub": [ /subscriptions/…/virtualNetworks/CLI-VNET/subnets/CLI-SUB" ]
    }
    ************ Azure Image Selecta ! **************
    Choose your Image ||{**}||

    1) RHEL          3) Oracle Linux  5) Windows       7) Abort?
    2) CentOS        4) Ubuntu        6) Suse
    Select an option and press Enter: 2
    Name    Publisher    Sku    Urn                                 Version ------  -----------  -----  ----------------------------------- --------------
    CentOS  OpenLogic    7.7    OpenLogic:CentOS:7.7:7.7.2020111300 7.7.2020111300

    ===== Instance Deployment Detail ========

    Selected Subnet name : CLI-SUB Selected Instance name : Demo-vm Selected instance Type : Standard_B1s Selected Security Group: sg_CLI-SUB_WEB UserName   : centos Selected OS : CENTOS ... Public IP creation... Name           Location       Stat       Allocation -------------  -------------  ---------  ------------ Demo-vm_pubip  canadacentral  Succeeded  Dynamic Network interface creation... Name         State      PrivateIP -----------  ---------  ----------- Demo-vm_Nic  Succeeded  192.168.0.4
    =========================================== Check the status of the new Instance =========================================== The compute instance is being created. This will take few minutes ... Enter the Path of your ssh key [~/id_rsa_az.pub]:
    selected public key: /home/brokedba/id_rsa_az.pub

    ResourceGroup PowerState PublicIpAddress PrivateIpAddress MacAddress  Location
    ------------- ---------- --------------- ---------------- ----------------- -------
    brokedba      VM running  40.85.21
    8.246     192.168.0.4   00-22-48-3B-BE-DB useast

    ssh connection to the instance ==> ssh -i /home/brokedba/id_rsa_az centos@40.85.218.246
    Your website is ready at this IP :) : http://40.85.218.246
    VM termination command ==> az vm delete –g brokedba -n Demo-vm --yes VNIC termination command ==> az network nic delete –g brokedba -n Demo-vm_Nic IP termination command ==> az network public-ip delete –g brokedba -n Demo-vm_Pubip VNET termination command ==> az network vnet delete –g brokedba -n CLI-VNET Disk termination command ==> az disk delete –g brokedba -n Demo-vm_OsDisk_1_fxxxxxxxx

    Below is the vm view on your Azure Portal once the instance is provisioned.

    This image has an empty alt attribute; its file name is az-cli_vm.png
  1. CONNECTION TO THE VM AND CHECK THE PUBLIC WEBPAGE

  • Grab the public IP and enter the private key to connect to your vm using ssh
  • $ ssh -i /home/brokedba/id_rsa_az centos@40.85.218.246 
  • Type the Public IP in your browser & check the customized Homepage using the custom-data run during bootstrap
    =>  http://40.85.218.246

    This image has an empty alt attribute; its file name is image.png

    The curious case of Windows vms 

The “--custom-data” parameter which takes the cloud-init file and sends its encoded content along with the provisioning configuration in azure does it only for Linux vms.You’ve read right, when providers like aws offer full cloud-init support in their cli-tool for all available images including windows, Microsoft doesn’t for it’s own OS !!

Azure proposed cheap option
The only way  to replace custom-data run when spinning windows vms is to remotely invoke commands on the vm after creation (which sucks). I had to add the below line to run my Powershell custom-data on the vm

    az vm run-command invoke -g "$rg_name" -n $instance_name --command-id SetRDPPort
    az vm run-command invoke -g "$rg_name" -n $instance_name --command-id RunPowerShellScript
    --scripts @cloud-init/Win_userdata.ps1


   CONCLUSION 

    • This exercise helped to know more about azure architecture than just practicing on a cli tool and JMESPATH tricks.
    • Az cli is still powerful, but I have to say that I felt quite a latency all along my lab even on simple queries where nothing was created. AWS and OCI for instance are way faster in terms of responsiveness (based on my useast tests) 
    • The fact that a custom route and internet gateway weren’t necessary a reduced my code footprint by almost 30%.
    • One caveat for windows provisioning is that azure doesn’t support cloud-init, but custom code can still run remotely  
    • Feel free to fork my repository and adapt your own version of these scripts
    • Improvement: add the option to add a subnet to vnets with existing subnet to create_az_subnet.sh script   

Thanks for reading!