Intro
Today, we will conclude our “Oracle Cloud automation" journey with deploying an instance using Ansible (roles). We will demonstrate how an Always-Free compute instance can be launched and accessed through SSH thanks to OCI Ansible Cloud Modules. This tutorial along with the previous Terraform and OCI-CLI shell labs will also help you prepare for the OCI Operations Associate exam (1Z0-1067). And as usual, playbooks used in this lab can be found in my GitHub repo.
NOTE >> : If you want to skip the concepts and get directly started with the lab just click on Ansible Setup.
- Content :
Overview and Concepts
I. Ansible Setup
II. Clone repository
III. Deployment
IV. Bummer
Overview and Concepts
Configure once deploy everywhere!…
Ansible
Is a deployment and configuration management platform that automates storage, servers, and networking. It can be run on the cloud, with dedicated servers, or even locally on your own machine. Today’s focus will be on its cloud provisioning capabilities.
The OCI Ansible cloud modules
Is a project created by Oracle to help OCI users provision, configure and manage OCI infrastructure using Ansible.
What have I tweaked
I have taken a sample playbook and adapted it to use oci ansible roles instead of modules because roles are cooler :D.
You’ll see that installing roles from ansible-galaxy (like a yum repo for ansible) is way simpler than the cumbersome manual module install.
Topology
The following illustration shows the layers involved between your workstation an OCI while running Ansible playbooks .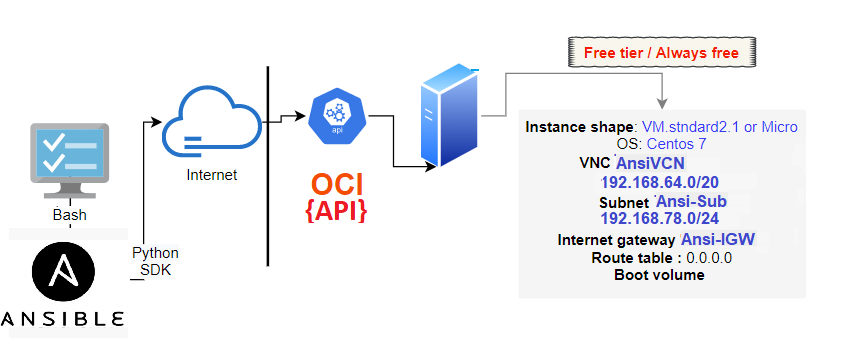
Terminology
• Idempotence: This means that a change/action is not applied twice. Ansible validates if tasks are done before applying
them to avoid duplicating effort (example: run yum install twice).
• Immutable: (i.e. terraform) No change is expected once our desired resource’s end state is deployed. If needed, the
resource is just wiped out and recreated with new settings. No need to troubleshoot anymore (Vm, Load balancers).
• Mutable: (i.e. Ansible) the resource is in constant mutation since deployment. We’ll mutate our stack ,
modify it in place, to get into new desired configuration.
Ansible Features
- Human readable
- No special coding skills needed
- Tasks executed in order and defined in playbooks ( yaml files) and run across multi hosts
- Agentless: uses Open SSH/WINRM and no agent to deploy/manage
- Modules/Roles : Discrete units of code (large community library)
- Uses an Inventory of target resources to run ad-hock commands or Playbooks though ssh
Learn the hard way
- Unlike Terraform that is stateful, Ansible is stateless which means that it does not keep track of previous executions .
- The code is applied in real-time from a control machine, but there is no easy solution to revoke the changes once they have
started (half-baked deployment syndrome when it fails before the end).
- Yaml files are extremely sensitive in terms of indentation so beware.
- name: Create a VCN
  oci_vcn:
    compartment_id: "{{ instance_compartment }}"
    display_name: "{{ vcn_name }}"
    cidr_block: "{{ vcn_cidr_block }}"
    dns_label: "{{ vcn_dns_label }}"
    config_profile_name: "{{config_profile}}"
    register: result
- set_fact:
    vcn_id: "{{ result.vcn.id }}""
I. Ansible setup Go to Top⭡
Currently Ansible can be run from any machine with Python 2.7 or Python 3.5 (and higher) installed. This includes popular Linux distros (Red Hat, Debian, CentOS, BSD) and MacOS. Windows is not supported for the control node. Therefore, I will use windows Linux subsystem WSL as control node here.
1. Install Ansible
1- Install ansible
$ RHEL:
sudo yum install ansible
$ ubuntu :
sudo apt install python3-pip      ---> if oci isn't installed
sudo apt-add-repository ppa:ansible/ansible
sudo apt-get update
sudo apt-get install ansible

2- install sdk:
sudo apt install python-pip   --->[RHEL: yum install python-pip]
$ pip install oci
Once installed, run the version command to validate your installation
$ ansible --version
  ansible 2.9.7
  config file = /etc/ansible/ansible.cfg
2. Install ansible OCI roles from ansible galaxy
As mentioned before, this deployment can only work if you install oci-ansible roles from ansible-galaxy
since I adapted the playbooks to use roles instead of the original modules available in the Official GitHub Repo.
--- automatic galaxy install ---
default role path is the first writable directory configured in DEFAULT_ROLES_PATH:~/.ansible/roles:/usr/share/ansible/roles:/etc/ansible/roles

$ ansible-galaxy install --roles-path=/etc/ansible/roles
$ ansible-galaxy list
  - oracle.oci_ansible_modules, v1.18.0
PATH : ~/.ansible/roles/oracle.oci_ansible_modules
3. Authentication with OCI
- With Ansible and oci cloud modules(roles) installed our lab still requires an IAM user with its API signing key .
- You’ll need to configure OCI-CLI so Ansible could authenticate to your OCI account via the config file (~/.oci/config)
- Environment variables can still be defined before running your playbooks (i.e. SAMPLE_COMPARTMENT_OCID)
II. Clone the repository Go to Top⭡
- Pick an area on your file system and issue the following command.
$ git clone https://github.com/brokedba/ansible-examples.git$ cd ansible-examples/oci-ansible/launch_free_instance/$ tree . ├── a_env_vars ├── check_network.yml --- test playbook before to check the setup ├── check_shapes.yaml ├── sample.yaml --- main playbook that’ll create the vm ├── setup.yaml --- child playbook that’ll create the vcn etc ├── teardown.yaml --- destroy playbook └── templates ├── egress_security_rules.yaml.j2 --- egress security list template └── ingress_security_rules.yaml.j2 --- ingress security list template
Repo content:
- a_env_vars: Contains environment variables ( i.e. compartment OCID)
- check_network.yml : Quick playbook (get facts) to verify the setup -- YAML
- sample.yml and setup.yml : To deploy our instance -- YAML
- teardown.yml to destroy our lab -- YAML
- jinja templates will also help us load the egress/ingress NSG security lists (rules) --- J2
III. Deployment Go to Top⭡
Environment variables and setup check
launch the instance
Assign SAMPLE_COMPARTMENT_OCID variable in a_env_vars with your compartment OCID and source the file.
Once done, run a test playbook that will generate an SSH keypair, and load security lists from our jinja templates.
$ cd ansible-examples/oci-ansible/launch_free_instance/
$ . a_env_vars
-- Test your setup using
$ ansible-playbook check_network.yml Let’s now launch our instance. You can click on the sample.yaml to see its content but it basically performs the below
- Sample.yaml will parse the declared variables then call setup.yaml that provisions the following
- Generates a temporary host-specific SSH key-pair to be used to connect to the instance after the launch
- Creates a necessary network(vcn, subnet..) and storage resources (volume) to be attached to the instance
- Sample.yaml will then create and launch a new instance based on the above resources on Centos7(MircroCompute)
- I added config_profile_name: "{{config_profile}}" so you can switch to specific profile listed in your oci config file(~.oci/config.cfg)
- Tasks are self explanatory. Tasks reports return OK when it’s just a set fact/lookup and CHANGED if something is really changed/created.
- Let's login this time manually from our terminal, we will need to locate the created ssh keys folder from temp directory
$ ansible-playbook sample.yaml

[WARNING]: provided hosts list is empty, only localhost is available. Note that the implicit localhost does not match 'all'

PLAY [Launch a compute instance and connect to it using SSH] *********************************************************************************

TASK [Gathering Facts] *********************************************************************************
ok: [localhost]

TASK [Check pre-requisites] *********************************************************************************
skipping: [localhost] => (item=SAMPLE_COMPARTMENT_OCID)

TASK [List availbility domains] *********************************************************************************
ok: [localhost]

TASK [set_fact] *********************************************************************************
ok: [localhost]

TASK [print the availability domain] *********************************************************************************
ok: [localhost] => {
    "msg": [{"compartment_id": "ocid1.tenancy.oc1..xxx",
             "id": "ocid1.availabilitydomain.oc1..xxxx",
             "name": "twts:CA-TORONTO-1-AD-1"} ]     }

TASK [List images] *********************************************************************************
ok: [localhost]

TASK [set_fact] *********************************************************************************
ok: [localhost]

TASK [print img_id] *********************************************************************************
ok: [localhost] => {"msg": "the name of the image is CentOS-7-2020.07.20-0"}

TASK [List shapes in first AD] *********************************************************************************
ok: [localhost]

TASK [set_fact] *********************************************************************************
ok: [localhost] => (item={u'memory_options': None, u'networking_bandwidth_in_gbps': 0.48, u'ocpus': 1.0, u'local_disks': 0, u'networking_bandwidth_options': None, u'shape': u'VM.Standard.E2.1.Micro', u'max_vnic_attachments': 1, u'ocpu_options': None, u'local_disks_total_size_in_gbs': None, u'gpu_description': None, u'memory_in_gbs': 1.0, u'gpus': 0, u'local_disk_description': None, u'max_vnic_attachment_options': None, u'processor_description': u'2.0 GHz AMD EPYC\u2122 7551 (Naples)'})

TASK [List shapes in second AD] *********************************************************************************
skipping: [localhost]

TASK [set_fact] *********************************************************************************
skipping: [localhost]

TASK [List shapes in third AD] *********************************************************************************
skipping: [localhost]

TASK [set_fact] *********************************************************************************
skipping: [localhost]

TASK [Create a temp directory to house a temporary SSH keypair for the instance] ********************************************************************************
changed: [localhost]

TASK [set_fact] *********************************************************************************
ok: [localhost]

TASK [Generate a Private Key] *********************************************************************************
changed: [localhost]

TASK [set_fact] *********************************************************************************
ok: [localhost]

TASK [Generate a Public Key] *********************************************************************************
changed: [localhost]

TASK [Create a VCN] *********************************************************************************
changed: [localhost]

TASK [set_fact] *********************************************************************************
ok: [localhost]

TASK [Create a new Internet Gateway] *********************************************************************************
changed: [localhost]

TASK [set_fact] *********************************************************************************
ok: [localhost]

TASK [Create route table to connect internet gateway to the VCN] *********************************************************************************
changed: [localhost]

TASK [set_fact] *********************************************************************************
ok: [localhost]

TASK [create ingress rules yaml body] *********************************************************************************
ok: [localhost]

TASK [create egress yaml body] *********************************************************************************
ok: [localhost]

TASK [load the variables defined in the ingress rules yaml body] *********************************************************************************
ok: [localhost]

TASK [print loaded_ingress] *********************************************************************************
ok: [localhost] => {
    "msg": "loaded ingress is {u'instance_ingress_security_rules': [{u'source': u'0.0.0.0/0', u'protocol': u'6', u'tcp_options': {u'destination_port_range': {u'max': 22, u'min': 22}}}, {u'source': u'0.0.0.0/0', u'protocol': u'6', u'tcp_options': {u'destination_port_range': {u'max': 80, u'min': 80}}}]}"
}

TASK [load the variables defined in the egress rules yaml body] *********************************************************************************
ok: [localhost]

TASK [print loaded_egress] *********************************************************************************
ok: [localhost] => {
    "msg": "loaded egress is {u'instance_egress_security_rules': [{u'tcp_options': {u'destination_port_range': {u'max': 22, u'min': 22}}, u'destination': u'0.0.0.0/0', u'protocol': u'6'}]}"
}

TASK [Create a security list for allowing access to public instance] *********************************************************************************
changed: [localhost]

TASK [set_fact] *********************************************************************************
ok: [localhost]

TASK [Create a subnet to host the instance. Link security_list and route_table.] *********************************************************************************
changed: [localhost]

TASK [set_fact] *********************************************************************************
ok: [localhost]

TASK [Launch an instance]---->  ACTUAL VM SPIN *********************************************************************************
changed: [localhost]

TASK [Print instance details] *********************************************************************************
ok: [localhost] => {
    "msg": "Launched a new instance {u'instance': {u'time_created': u'2020-08-10T04:39:54.207000+00:00', u'primary_public_ip': u'132.145.100.168', u'shape': u'VM.Standard.E2.1.Micro', u'ipxe_script': None, u'id': u'ocid1.instance.oc1.ca-toronto-1.xxx', u'agent_config': {u'is_monitoring_disabled': False, u'is_management_disabled': False}, u'fault_domain': u'FAULT-DOMAIN-1', u'extended_metadata': {}, u'time_maintenance_reboot_due': None, u'compartment_id': u'ocid1.tenancy.oc1..xxx', u'defined_tags': {u'Oracle-Tags': {u'CreatedOn': u'2020-08-10T04:39:53.283Z', u'CreatedBy': u'oracleidentitycloudservice/brokedba’}}, u'primary_private_ip': u'192.168.10.2', u'freeform_tags': {}, u'source_details': {u'source_type': u'image', u'image_id': u'ocid1.image.oc1.ca-toronto-1.xxxx', u'kms_key_id': None, u'boot_volume_size_in_gbs': None}, u'dedicated_vm_host_id': None, u'metadata': {u'ssh_authorized_keys': u'ssh-rsa xxxbcG5fPEwc+yUGN4nYXbTWgTeV'}, u'system_tags': {u'orcl-cloud': {u'free-tier-retained': u'true'}}, u'image_id': u'ocid1.image.oc1.ca-toronto-1.aaaaaaaaxxxx', u'availability_domain': u'twts:CA-TORONTO-1-AD-1', u'display_name': u'ansi_inst', u'lifecycle_state': u'RUNNING', u'shape_config': {u'networking_bandwidth_in_gbps': 0.48, u'ocpus': 1.0, u'local_disks': 0, u'max_vnic_attachments': 1, u'local_disks_total_size_in_gbs': None, u'gpu_description': None, u'memory_in_gbs': 1.0, u'gpus': 0, u'local_disk_description': None, u'processor_description': u'2.0 GHz AMD EPYC\\u2122 7551 (Naples)'}, u'region': u'ca-toronto-1', u'launch_options': {u'remote_data_volume_type': u'PARAVIRTUALIZED', u'firmware': u'UEFI_64', u'boot_volume_type': u'PARAVIRTUALIZED', u'is_consistent_volume_naming_enabled': True, u'network_type': u'PARAVIRTUALIZED', u'is_pv_encryption_in_transit_enabled': False}, u'launch_mode': u'PARAVIRTUALIZED'}, u'changed': True, 'failed': False"
}

TASK [set_fact] *********************************************************************************
ok: [localhost]

TASK [Create a volume] *********************************************************************************
ok: [localhost]
TASK [Print volume details] *********************************************************************************
ok: [localhost] => {
    "msg": "Created a new volume {u'volume': {u'lifecycle_state': u'AVAILABLE', u'size_in_gbs': 50, u'display_name': u'ansi_vol', u'volume_group_id': None, u'compartment_id': u'ocid1.tenancy.oc1..axxxx', u'defined_tags': {}, u'system_tags': {u'orcl-cloud': {u'free-tier-retained': u'true'}}, u'kms_key_id': None, u'freeform_tags': {}, u'time_created': u'2020-05-25T02:03:21.633000+00:00', u'source_details': None, u'availability_domain': u'twts:CA-TORONTO-1-AD-1', u'size_in_mbs': 51200, u'is_hydrated': True, u'vpus_per_gb': 10, u'id': u'ocid1.volume.oc1.ca-toronto-1.ab2g6'}, 'failed': False, u'changed': False}"}

TASK [set_fact] *********************************************************************************
ok: [localhost]

TASK [Attach volume to new instance] *********************************************************************************
changed: [localhost]

TASK [Print volume attachment details] *********************************************************************************
ok: [localhost] => {"msg": "Attached volume to instance {'failed': False, u'changed': True, u'volume_attachment': {u'lifecycle_state': u'ATTACHED', u'availability_domain': u'twts:CA-TORONTO-1-AD-1', u'display_name': u'volumeattachment20200810044202', u'compartment_id': u'ocid1.tenancy.oc1..xxxx', u'iscsi_detach_commands': [], u'time_created': u'2020-08-10T04:42:02', u'id': u'ocid1.volumeattachment.oc1.ca-toronto-1.anxxx', u'instance_id': u'ocid1.instance.oc1.ca-toronto-1.anxxxx', u'is_read_only': False, u'volume_id': u'ocid1.volume.oc1.ca-toronto-1.ab2g6xxxx', u'device': None, u'is_shareable': False, u'attachment_type': u'paravirtualized', u'is_pv_encryption_in_transit_enabled': False, u'iscsi_attach_commands': []}}"}

TASK [set_fact] *********************************************************************************
ok: [localhost]
TASK [Get the VNIC attachment details of instance] *********************************************************************************
ok: [localhost]

TASK [Get details of the VNIC] *********************************************************************************
ok: [localhost]

TASK [set_fact] *********************************************************************************
ok: [localhost]

TASK [Print the public ip of the newly launched instance] *********************************************************************************
ok:[localhost]=> {"msg":"Public IP of launched instance 132.145.100.168"}

TASK [Wait (upto 5 minutes) for port 22 to become open] *********************************************************************************
ok: [localhost]

TASK [Attempt a ssh connection to the newly launced instance] *********************************************************************************
changed: [localhost]
TASK [Print SSH response from launched instance] *********************************************************************************
ok: [localhost] => {"msg": "SSH response from instance –>
[u'Linux ansi-compute 3.10.0-1127.13.1.el7.x86_64 #1 SMP Tue Jun 23 15:46:38 UTC 2020 x86_64 x86_64 x86_64 GNU/Linux']"}

PLAY RECAP *********************************************************************************
localhost:
ok=46   changed=11 unreachable=0  failed=0  skipped=5    rescued=0    ignored=0
$ ssh -i /tmp/ansible.VlmG3Dcert/id_rsa.pem opc@132.145.100.168
[opc@ansi-compute ~]$ cat /etc/redhat-release
CentOS Linux release 7.8.2003 (Core)
IV. Bummer Go to Top⭡
- Even though Ansible provides ways to manage infrastructure and configuration in the cloud, it's statelessness makes it virtually impossible to rely on compared to Terraform.
- For example, in Terraform you declare the desired end state and Terraform keeps track of what is available and what needs to be created in a statefile. Ansible on the other hand executes the tasks in sequence without keeping track of what has already been done.
- To demonstrate the above point let’s try running our playbook another time.
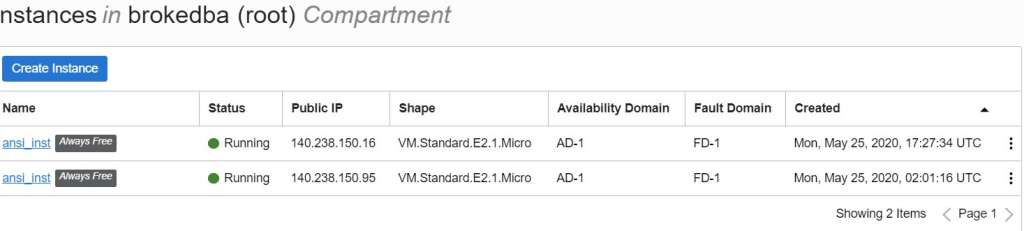
CONCLUSION
- We proved in this lab that ansible can also deploy cloud resources (instance) but not without caveats.
- Ansible's idempotence claims are a bit overblown as it relies on a direct ssh connection to the target host which is not managed In these modules. I have been told assert statements would fix this but it didn’t work for me.
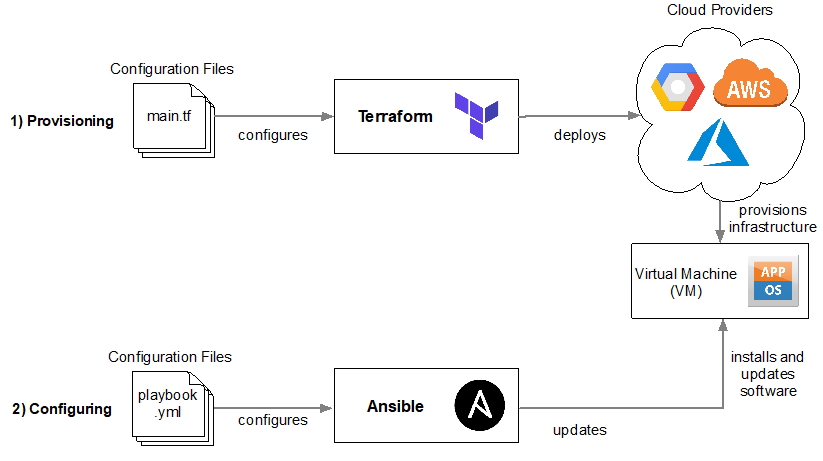
- The best practise from devops perspective at this point is to have Terraform launch(bootstrap) custom images that are already mostly ready to go (~90%) and have the last 10% happen via cloud-init (bash, ansible-pull, etc).
- However, If you want to test your service on a dedicated servers Ansible might be the better suited for the task.
- That being said even Hashicorp and Redhat which respectively own both tools never ignored their potential complementarity as you can see in this joined presentation called "Ansible & terraform Better together" ;)
EDIT
- "Dynamic inventory scripts" and "Dynamic inventory plugin" can be used with Ansible to more easily manage infrastructure (checks for the existence of a resource via tags before creating it). However, it didn't work for me and the configuration doc wasn't that clear (the playbook kept running like nothing changed).
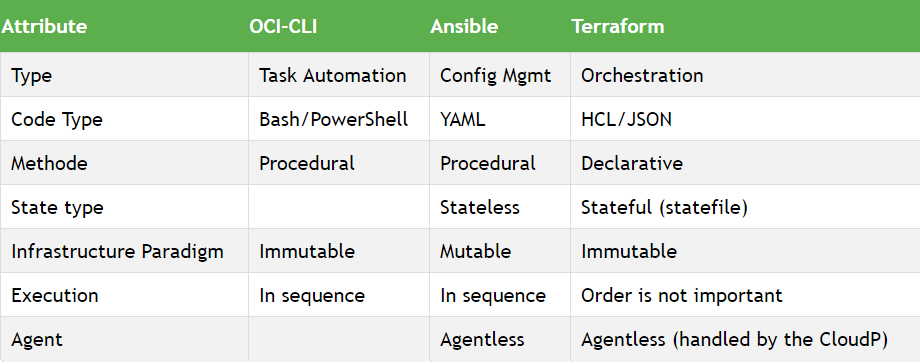
- If we want to stick to the distinct benefit for each of Tf & Ansible the below graphic is pretty fair .
- Some also like executing #Ansible playbooks with Packer to prepare the custom image then spin it using terraform as Cloudinit script modification can be a source of undetected configuration drift.
Thanks for reading. Next stop AWS Go to Top⭡


