I recently had a weekly digest from medium website and noticed a blog post talking about configuring OCI in 5 minute. The funny thing is that you had to pay a subscription to read about what Oracle documented for free. I don’t know how SEO works but I thought I would use the same title in case people wanted to get access to a comparable tutorial for free. And since my next articles will depend on OCI-CLI, I might a well do it for me.
Context: This is the first article in a series of 4 which aims to prepare learners for quick hands on experiences on OCI.
Install and configure oci-cli.
Launch an instance using oci-cli.
Launch a VCN and and an Instance using Terraform.
Launch an instance using oci ansible modules.
Requirement
I have done the installation on windows 10 but the basic install will always require 3 elements:
You are prompted to provide installation locations. The script will install Python 3.5 for you.
Git bash installation (windows)
This will allow you to have a linux like bash environment where to run oci-cli from. Very straight forward Installation but you can check this install-guide for details.
Linux/Mac box installation
You would have to run the bellow in a terminal session:
On Linux the install script will install python 3.5 for you. However, it won’t be the case for Mac OS as you’d have to install a compatible python version before installing oci-cli.
Common prompts : You might be asked to confirm an upgrade if there is an existing version as well as whether you want to update the PATH environment variable.
II. Configure CLI
Once your free account is created and Git Bash installed proceed with the below CLI Setup tasks:
Gather Tenancy OCID Go to the profile icon on the top right of the console page and click on Tenancy.
Oci profile
> Click copy under the tenancy information’s OCID field. Save in your notepad.
Tenancy
Gather Compartment OCID Go to Menu -> Identity -> Compartments and hover on the ocid column to see the little info bubble and copy the ocid. Save it in your notepad.
Compartment
Gather User OCID Go to Menu -> Identity> Users and select the User with your email as a handle. User Info
Click copy and save the OCID in your notepad.
Generate an API Signing Key pair
API key is the last information you will need and no you don’t need to create ssh key pair to interact with your oci account so I won’t include it here. Run below commands from the Git-Bash terminal in any folder you like: Private pem key
brokedba@ MINGW64> cd ~/.oci
$ openssl genrsa -out .oci/oci_api_key.pem 2048
 Generating RSA private key, 2048 bit long modulus (2 primes)
Copy the content of the public key and add an API key in the oci Console.
$ cat oci_api_key_public.pem | pbcopy
Sign in in to the Cloud Console and Go to Menu -> Identity -> Users -> API Keys -> Add Public Key > Copy the content of the pem public key and click Add.
Run CLI Setup
Now that you have all the files along with the tenancy info gathered in your notepad (i.e: TenInfo.txt), you can finally configure your oci-cli . To do so run the following:
$ oci -v
 2.10.0
$ oci setup config
Enter a location for your config [/c/Users/brokedba/.oci/config]: Enter a user OCID: # paste your User OCID Enter a tenancy OCID: # paste your tenancy OCID Enter a region : # choose the one defined in your tennacy (Webconsole)
 Do you want to generate a new API Signing RSA key pair?
[Y/n]: n
Enter the location of your API Signing private key file: /c/Users/brokedba/.oci/oci_api_key.pem
Fingerprint: xxxxxxxxxxxxxxxxxxxxxxxxxxxxxxxxxxxxxxx
Config written to /c/Users/brokedba/.oci/config
Important : Avoid folder Names that have spaces, Python hates it. Just keep the default directory “C:\Users\MyUser”. Below is the final content of the config file needed upon each API request:
What you can do if it’s just a free tier account and you want to practice real quick with oci-cli is to:
Create environment variables that stores all your tenancy,user and Compartment ocids so your commands would be shorter (can be in file that you’d source).
Now go and run your first list request to get the default availability domain in your tenancy:
$ oci iam availability-domain list
{ "data": [
    { "compartment-id": "ocid1.tenancy.oc1..axxxxx",
    "id": "ocid1.availabilitydomain.oc1..aaaaaaaawshktv3wktr5rplplpshn5vsugutbhi",
    "name": "BahF:CA-TORONTO-1-AD-1"
    }
   ]
 }
If you don’t like the Json output you can always go for a table layout:
oci iam availability-domain list --output table
+-----------------------------+------------------+------------------------+
|   compartment-id            |    id            |  name                  |
+-----------------------------+------------------+------------------------+
| ocid1.tenancy.oc1..aaaa5g4a | ocid1.availabili | BahF:CA-TORONTO-1-AD-1 |
+-----------------------------+------------------+------------------------+
Conclusion :
I think I said 5 minutes which was a bit optimistic but you got the idea ;), and that’s what you’ll remember. Feel free to consult the OCI CLI Command Reference for more request examples.
“Visionary, outstanding, almost magic” that’s what I thought the first time I got my hands on Tmate. Sure, we all know about TeamViewer, VNC, and other remote desktop products we used hundred times to help our parents or friends through a shared screen. But nothing compares nor prepares you for this in terms of simplicity and seamlessness, especially if Terminals are part of your daily job.
Remote collaboration, in these quarantine times, became more than vital. It was only after posting an issue on a random project on GitHub that someone proposed help through slack and mentioned “live troubleshooting”. I wasn’t sure what he meant but I decided to join and explained my problem. Next thing I know, a command line I pasted made him connect to my virtualbox vm and here he was hammering keys on my own terminal. All this with zero latency while he was in Madrid and I in Toronto. That was lit! Total ubiquity, full encryption and of course completely free. Those were the features of Tmate, an opensource fork of Tmux (local terminal multiplexer) which lets you attach a terminal session from across the world. No more sharing all your desktop’s screen and worrying about your sensitive data or browser tabs you forgot to close. That’s where I thought this little discovery deserved a post on its own.
For those wondering, Tmate was developped by Nicolas Viennot who opened its source since 2013 hoping to promote pair programing between strangers across the globe.
How it works
Once installed in your machine you’d run tmate command to establish a secure SSH connection with tmate.io’s public server that’ll return random SSH and HTML connection strings for your session. Your friend will then paste the connection string (or URL) to attach your terminal session and instantly start interacting with it. This is particularly helpful when using different keyboards. To add more to this awesomeness, remote clients don’t even need Linux as they can pair through a web browser. You can learn more about the architecture from the author’s paper, or by checking the below diagram I managed to draw from reading his publication ;).
Tmate Architecture
Network: The SSH public server (ssh.tmate.to) resolves 4 IPs spread across San Francisco, New York, London, and Singapore which makes it highly available. When the fastest server is elected, the remote tmate(tmux) daemon sends back the connection strings to the session running tmate. Whenever a disconnection happens between a host and remote tmate, or remote tmate & proxy, or proxy & master, sessions reconnect automatically and sync back (with likely a different socket name). Tmate goes through NATs and tolerate host IP changes while its proxy ensures the transparency of remote clients connection. Connection string: The 25 character long random id generated for the session is called token.
Installation
In this tutorial, we will learn how to install and use Tmate for remote terminal sharing. It will prove handy for pair-programming, live troubleshooting, or managing servers from a remote location. The example depicts how I quickly shared my virtualbox environment with someone who could jump in live and resolve my issue (providing the vm had access to internet).
1. Open a terminal and enter the following command.
-Your will see all available connection strings for both web and ssh (read write/read only) accesses. > Copy the content and hit q to clear the screen.
Tip: if you wish to use tmate only for remote access, run: tmate -F
[0/0]To see the following messages again, run in a tmate session: tmate show-messages
Press <q> or <ctrl-c> to continue
---------------------------------------------------------------------
Note: clear your terminal before sharing readonly access
web session read only: https://tmate.io/t/ro-Kjh2VHM8xpAEEUjnNxz4aavMbssh session read only: ssh ro-Kjh2VHM8xpAEEUjnNxz4aavMb@nyc1.tmate.ioweb session: https://tmate.io/t/ytNAPhtmczmkbPs2aAvWpEK5Cssh session: ssh ytNAPhtmczmkbPs2aAvWpEK5C@nyc1.tmate.io
3. From the remote machine, open a terminal, past the ssh connection string, hit enter and voila. You are now connected to the host session without any authentication setup. > Let’s run a command.
- Alternatively, you could do the same from a web browser by entering the mentioned session URL.
4. Your host machine will now display the same command ran from above remote client.
5. Find tmate session information and currently connected clients, using the following command:
tmate show-messages
The proxy notifies the host of any clients joining or leaving the session.
- If you only want your remote client to interact with the session you can use the “-F” option
Note: For those who want to use named sessions instead of tokens to be restart consistent. They will have to request an API key from tmate website and then run a command that would look like this:
tmate -k API_KEY -n session-name
End Session
6. To end tmate session enter exit command (always remember this!).
exit
Install your own server
If you are a security freak you can always host the whole tmate infrastrcuture in your own server by deploying the docker images listed below: (more details at tmate.io)
tmate-kube (kubernetes to create and manage above containers)
Once installed your local machines you want to share sessions from should include the below attributes in the ~/.tmate.conf file
set tmate-server-host Mytmatehost
set tmate-server-port 2200
set -g tmate-server-rsa-fingerprint    "SHA256:MyTmateFngerprint"
set -g tmate-server-ed25519-fingerprint"SHA256:tmateEdDSAFingerprint”
WHAT’S NEXT
I keep enjoying tmate as I was just live fixing a kvm terraform issue I was stuck on, yesterday, with the help of a developer from Sao Paulo (Brazil). Such a cool way to learn and discover the world ;). Feel free to talk about it with your colleagues. #Dobrigado :)
Those who aren’t lucky enough to use VMware or Hyper-V in their infrastructure might find it painful to provide a seamless way to manage their virtual backup and recovery strategy (i.e Ovm, kvm..etc.). Veeam turns out to be a solid alternative that might spare the pain of reinventing the wheel along with the hours of scripting that come with it. Today we will demonstrate that with a software like Veeam, we can restore an Oracle Database vm as if it was a physical machine using its Bare Metal recovery feature on a dummy virtual machine. Note that although the lab is based on VirtualBox, I have had a similar result when running it for OVM. The following are the steps necessary to reproduce a simple DR test with VirtualBox vms (scripting free).
Veeam 10 requires framework.net 4.7 and for that you will need to make that windows server 2012 has the required pack (Instruction and download links are available here if your using an old version).
2. VM lab setup overview
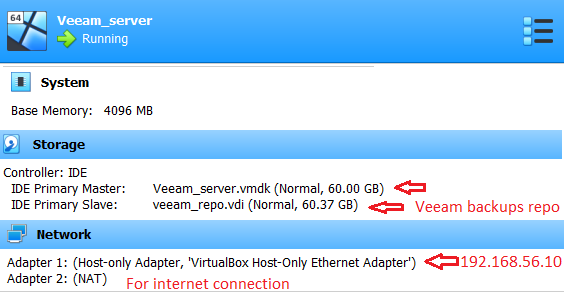
Veeam backup server
Veeam backup and replication server vm (192.168.56.10)
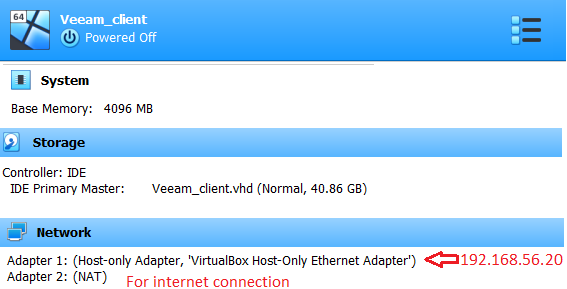
Veeam Oracle target
Virtual box oracle vm (192.168.56.20)
Note: Make sure you have defined the host only adapter network in Virtualbox
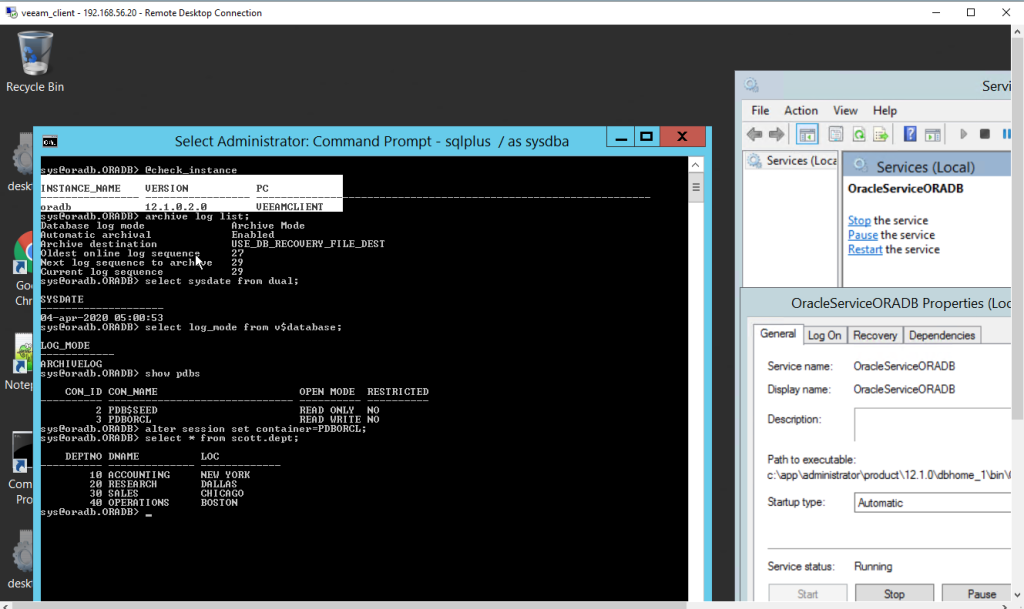
Database: I chose a 12c multi-tenant database for this lab but it doesn't matter.
Oracle Database 12c Enterprise Edition Release 12.1.0.2.0
- 64bit Production
Database log mode              Archive Mode
   CON_ID CON_NAME                       OPEN MODE  RESTRICTED
---------- ------------------------------ ---------- ----------
         2 PDB$SEED                       READ ONLY  NO
         3 PDBORCL                        READ WRITE NO
Oracle Database 12c Enterprise Edition
Once subscribed for the 30 days trial, download the installer (iso) and mount in on your veeam_server vm
Run the installer and specify windows builtin account as main veeam account. Note : Windows 2012 R2 users will need to install the following update (KB2919355) as .NET Framework 4.7 is necessary.
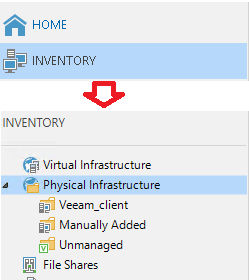
We will first have to create a protection group and add it to the infrastructure inventory which is just another name for Backup targets .
Go to inventory section under Physical infrastructure folder and click Create protection group.
Create protection group
Give the protection group a name.
group name
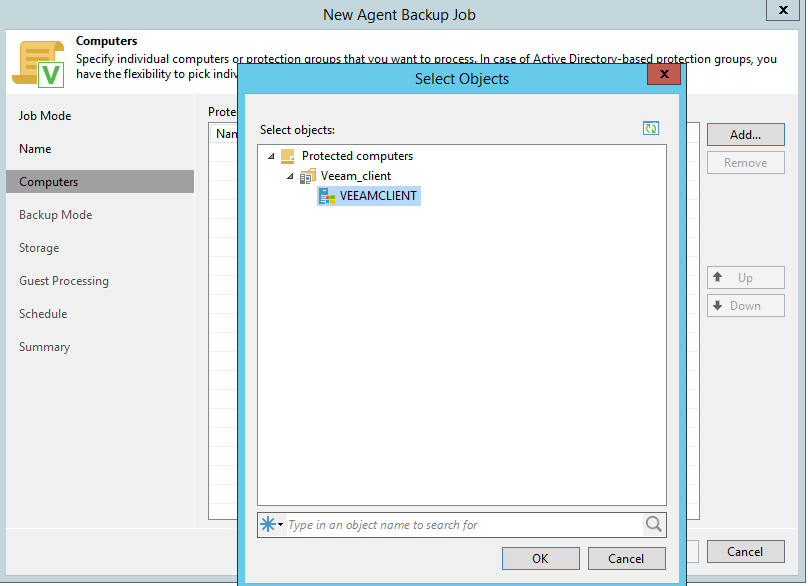
Choose individual computers as type of protection group.
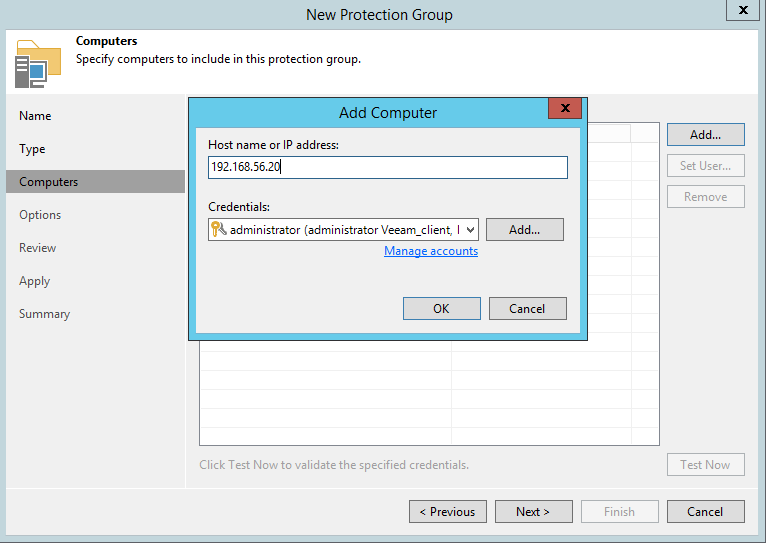
Add the target vm you want to backup (IP address along with admin credentials)
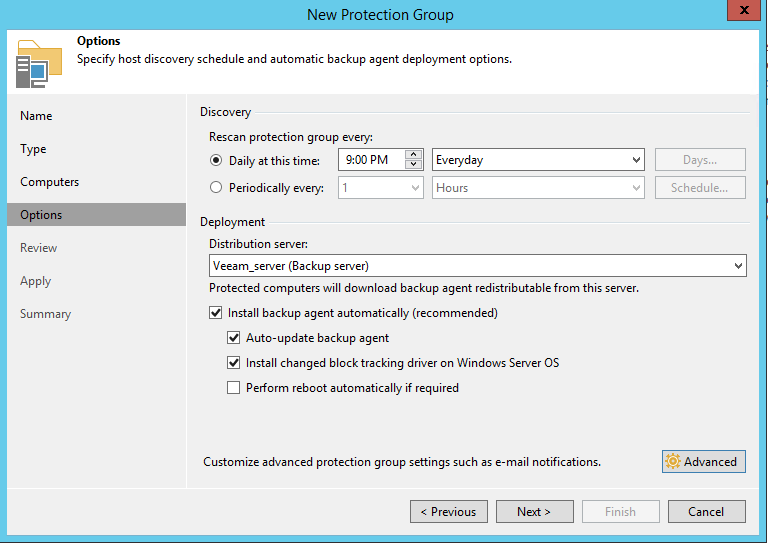
The next segment is basically the options available for your agent deployment on the target computer and the daily schedule of agent check.
This portion is responsible of deploying the agent on the target system.
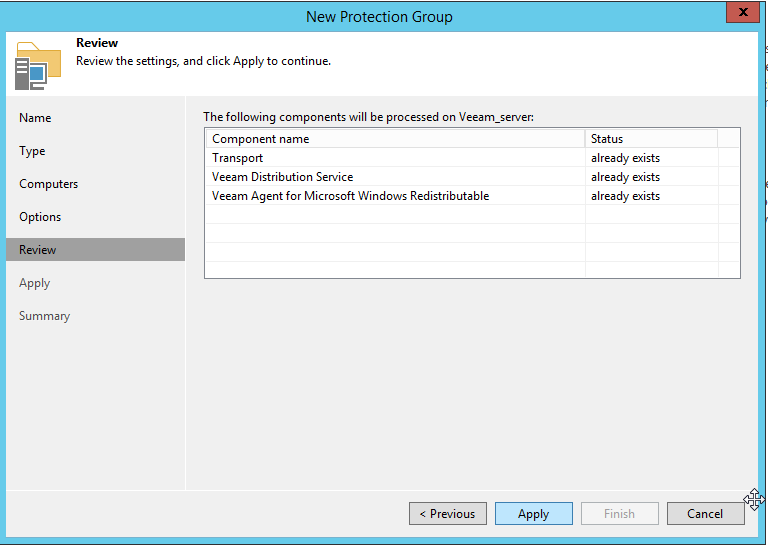
Review and apply
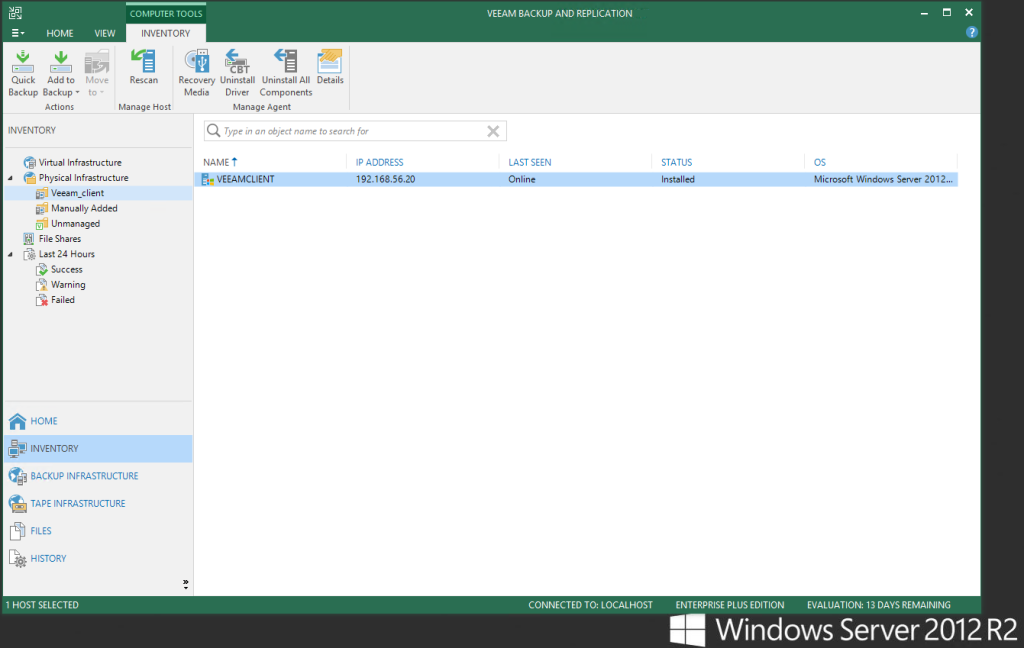
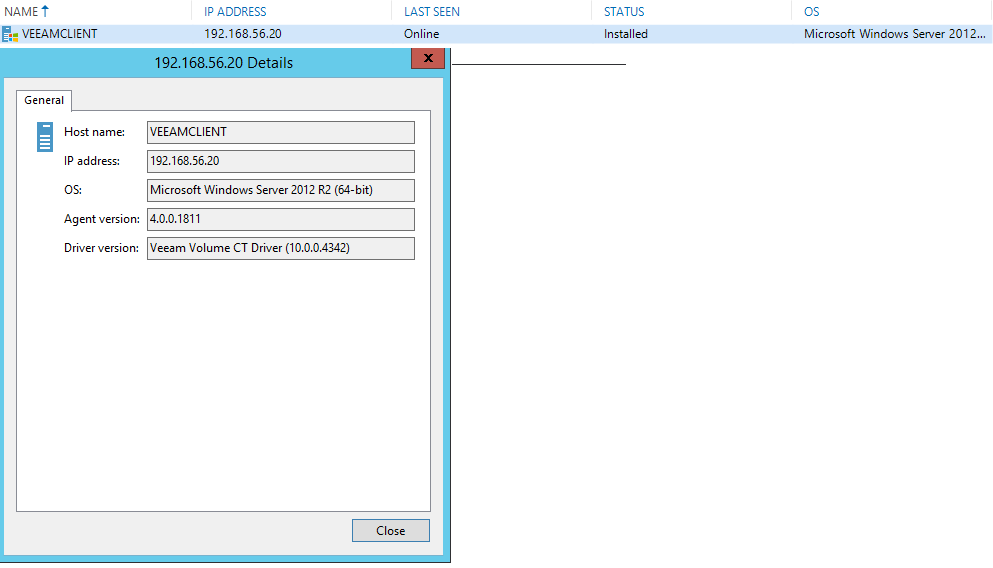
Once the deployment is finished, close the window . The new group will be displayed in the inventory where you can click right to select details to check the agent info
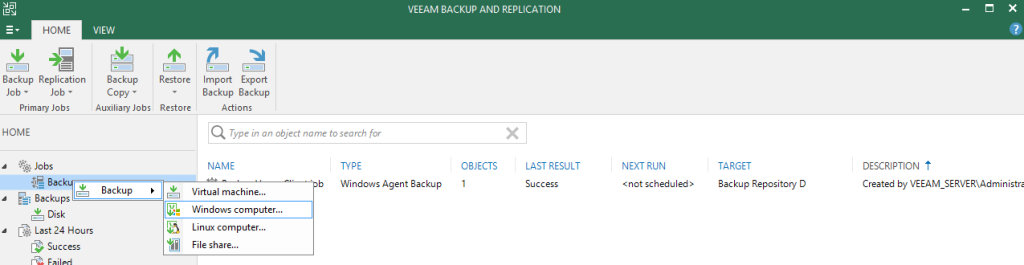
Confusion overFull vs Active Full:
You will notice that there are two buttons available on the backup job interface .
START (synthetic) and ACTIVE FULL (active).
They are both full backups, the only difference lies in the way the source data is retrieved
ActiveFull backup gets the data from the target system and is always done the first time a backup is run.
Synthetic Full backup gets its data from existing backups stored in the backup repository and changed files in the source vm to reduce CPU/Network overhead.
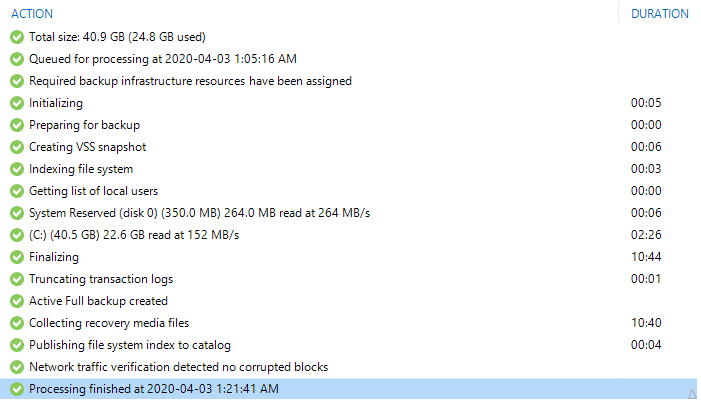
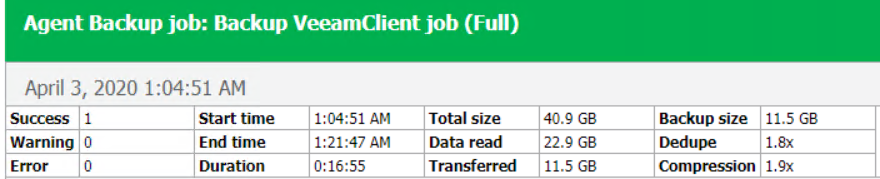
hence our first backup will be de-facto run as an active full backup. Below screen shot displays the report of my first backup which was pretty fast for a 24GB target vm.
Let’s have a closer look into the details of this job. Notice it only took 2 minutes to read 23GBs (probably because vms were in my laptop) while most of the work was consumed by recovery media files collection. These very files will be helping us to create the Veeam recovery media (sort of bootable recovery drive)
Note : The source disks are virtual disks(vmdk) but the compression here still reached a x2 fold ratio.
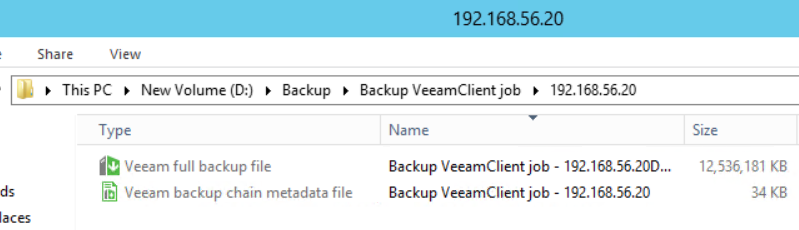
The Resulting backup output is two files including both data and metadata of the backup
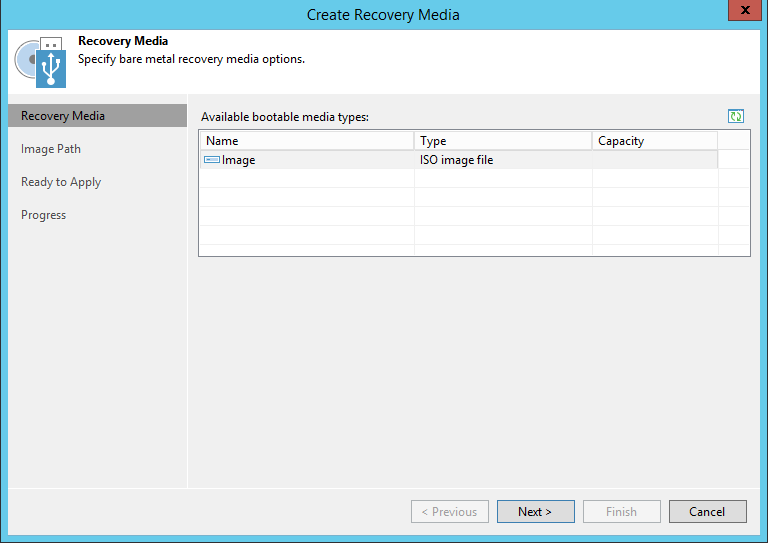
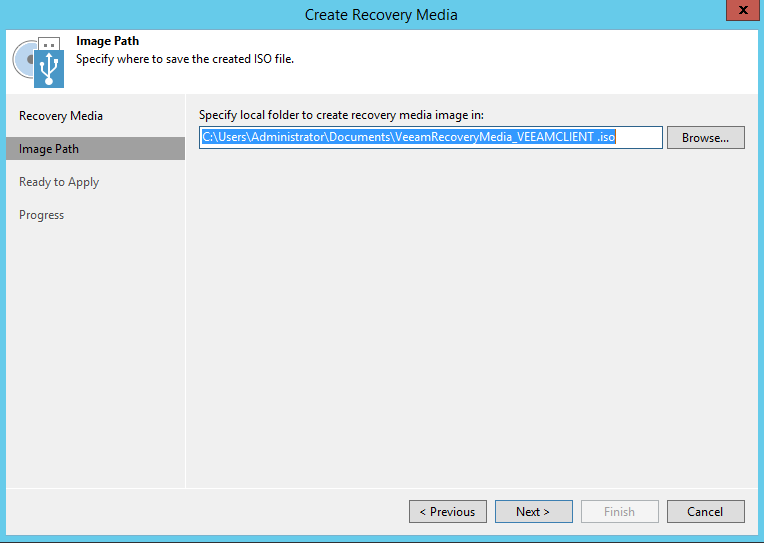
That's where the fun begins. Now that the ISO file is ready we can finally get to the real deal and prepare our DR test. To make it even safer we will not need to literally destroy the original vm but only switch it off to avoid IP overlap when booting the new machine.
The trick here is to fool Veeam backup tool by spinning a shell vm with similar hardware specs (disks/network adapters) to the original machine before mounting the recovery ISO in the DVD drive.
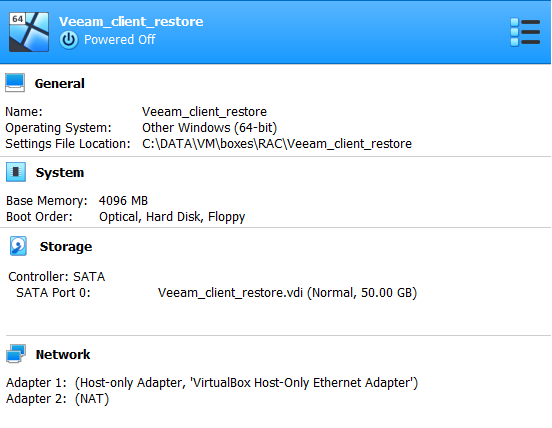
Create a new shell virtual machine with the below specifications
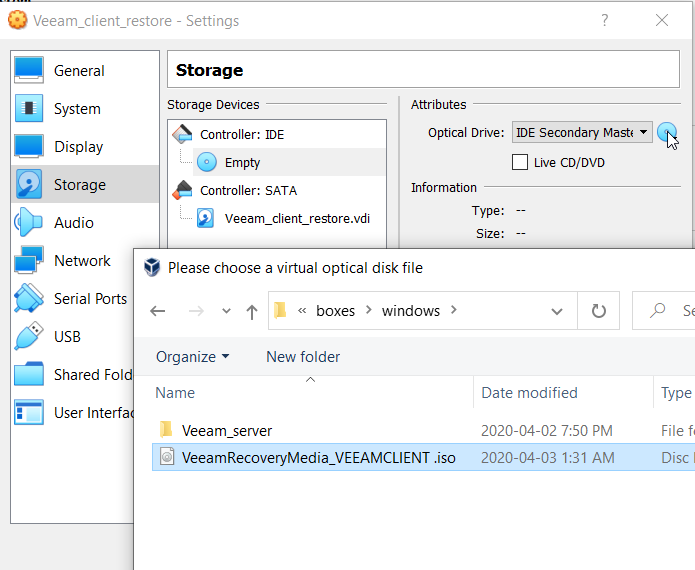
Copy the ISO file to the Host machine and mount it into the vm’s DVD drive
Boot the new virtual machine . We will be prompted with the following boot menu that gathers both Windows and Veeam Recovery tools. We will proceed by choosing Bare Metal Recovery on our new virtual machine.
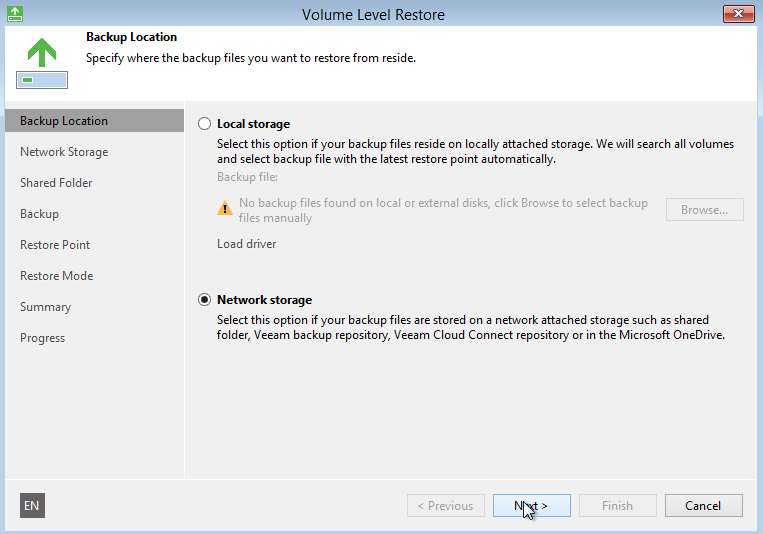
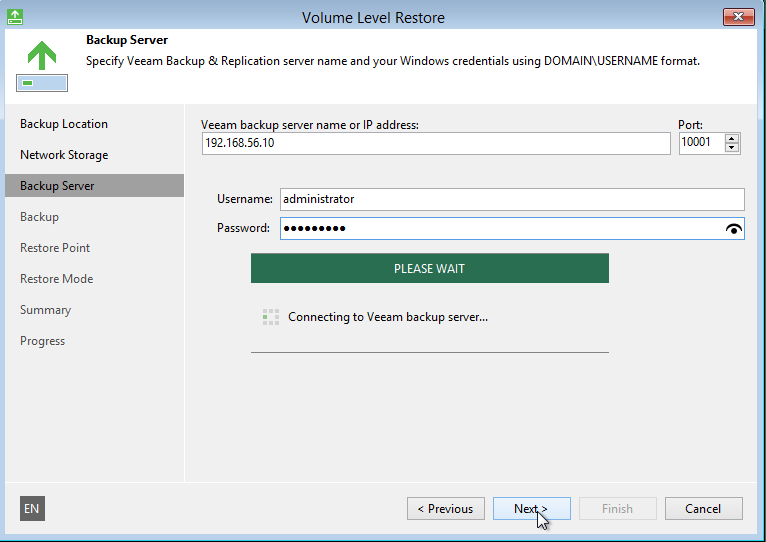
Select network storage as our backup is located in the backup server repository
Type the IP address and credentials of the Veeam backup server
Select the last available backup
Attention: Make sure the new vm’s disks are as large as the original ones otherwise your restore will trigger an error (Unable to auto-match disks)
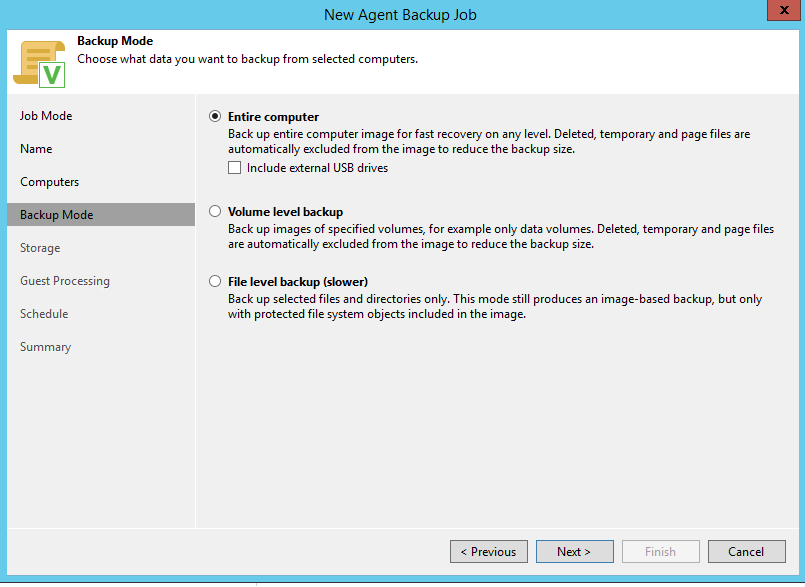
Select Entire computer as restore mode
After reviewing the summary click restore
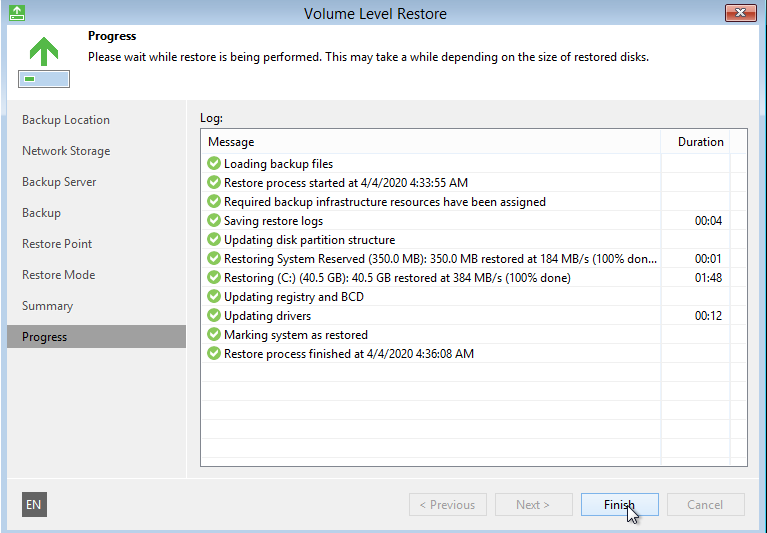
The Restore of 23GB Backup is done in only 2 minutes with an impressive I/O throughput
Sweet! now let’s check whats under the hood.
Tip : Do not accept to reboot. Just shutdown the vm and un-mount the ISO before restarting the vm.
Restart the new restored vm . Here I used an RDP session pointing to the original IP = 192.168.56.20 . After Ignoring the shutdown even tracker the database service is up and consistent (Archive mode on) .
Smooth and easy. We have just demonstrated how virtual machines can be recovered through a Veeam Backup feature that is initially built to restore Bare Metal servers. Quite a simple and effective solution for shops that use non flexible hyper-visors like OVM where recovery implementations can be tedious.
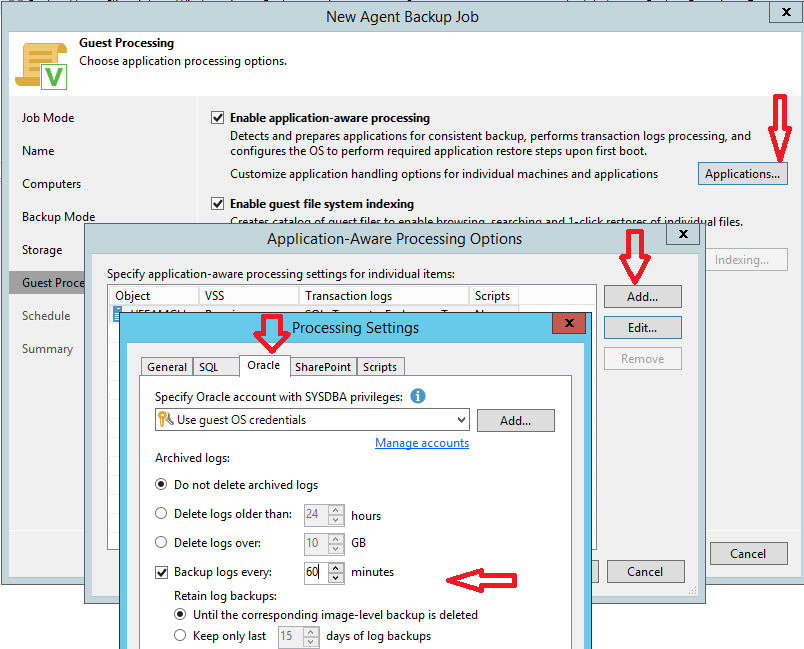
Think of all the production refreshes done in a timely fashion when urgent needs emerge. On top of that the synthetic backups will also reduce the overhead on your production system. Furthermore the backup used in this lab incurred no downtime (hot backup) and the Application-Aware Processing feature coupled with Microsoft VSS technology guarantee a transactionally consistent backup for windows machines(Oracle/SQL server/sharepoint).
Veeam for Linux vms:
I have tried to deploy the Veeam agent for Linux the same way than for windows. However you will need to install both dkms and kernel-devel packages before deploying the agent (you might need help from Veeam support if issues arise).