Friday, December 2, 2016

70-462 Training Kit Setup Preparation: Hyper-V - SQL server 2012 on Windows server 2012 R2 - Part 2

Here we are in the last section to configure the practice Setup . We will assume at this point that sysprep has been executed on the parent Vm as described in the first part of this Lab (see Part 1>>) and all the VMs have gone through setup process. 

  1. OS Configuration Overview

This section is comprised of the bellow tasks: 
- Re-name all servers
- Configure IP addresses, 
- Install and configure the CONTOSO.COM domain,
- Join all servers to the domain. 

The following instruction are to be applied in order to set the domain controller machine along with the network configuration for each of the remaining VMs

A- Prepare DC server

 Open a Command line box and run the following: (using Windows Key + R : cmd)
Netsh interface ipv4 set address "Ethernet" static 10.10.10.10
netdom renamecomputer %computername% /newname:DC
re-start using shutdown /r /t 0 

B- Prepare SQL-A server

 Open a Command line box and run the following: 
Netsh interface ipv4 set address "Ethernet" static 10.10.10.20
Netsh interface ipv4 set dnsservers "Ethernet" static 10.10.10.10 primary
netdom renamecomputer %computername% /newname:SQL-A
re-start using shutdown /r /t 0  
       

C- Prepare SQL-B server

 Open a Command line box and run the following: 

Netsh interface ipv4 set address "Ethernet" static 10.10.10.30
Netsh interface ipv4 set dnsservers "Ethernet" static 10.10.10.10 primary
netdom renamecomputer %computername% /newname:SQL-B
re-start using shutdown /r /t 0          

D- Prepare SQL-C server

Open a Command line box and run the following: 
Netsh interface ipv4 set address "Ethernet" static 10.10.10.40
Netsh interface ipv4 set dnsservers "Ethernet" static 10.10.10.10 primary
netdom renamecomputer %computername% /newname:SQL-C
re-start using shutdown /r /t 0  

E- Prepare SQL-D server

  • Open a Command line box and run the following: 

Netsh interface ipv4 set address "Ethernet" static 10.10.10.50
Netsh interface ipv4 set dnsservers "Ethernet" static 10.10.10.10 primary
netdom renamecomputer %computername% /newname:SQL-D
re-start using shutdown /r /t 0  

F- Prepare SQL-Core server

  • Open a Command line box and run the following: 
Netsh interface ipv4 set address "Ethernet" static 10.10.10.60
Netsh interface ipv4 set dnsservers "Ethernet" static 10.10.10.10 primary
netdom renamecomputer %computername% /newname:SQL-Core
 re-start using shutdown /r /t 0 

G- Install and configure the domain controller CONTOSO.COM

  • Power on the DC vm and login.
  • Server Manager: Add Roles and Features:     Next> Next>

  • Add Active Directory Domain Services. It will prompt you to install additional services and features too:
  • Click Add Features. Also check DNS Server, Add Features and Next

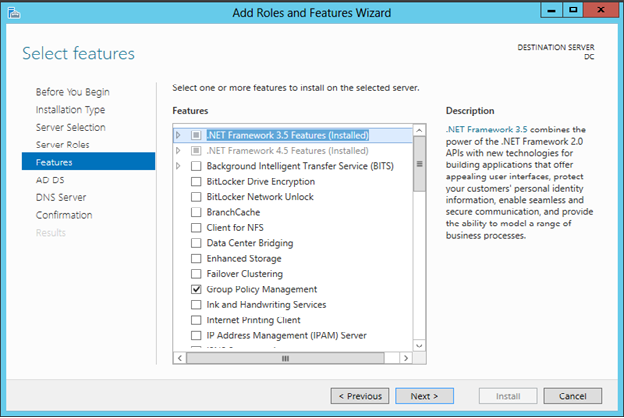
  • Next:      (notice Group Policy Management has been added for you)     
  • Next:

  • Next: double check "Specify an alternate source path" be sure it is set to D:\Sources\SxS\
  • Click Install. This will take approximately 5 minutes.Once installation is complete, the software needs to be configured.

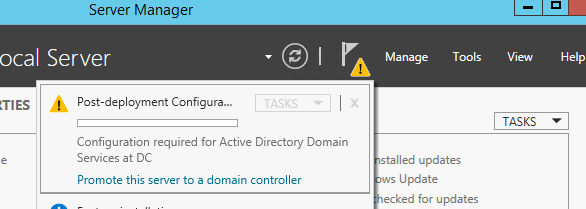
  • Click on the link "Promote this server to a domain controller" in server manager:
  •  Add a new forest with the correct domain name: CONTOSO.COM & enter the same password as above:
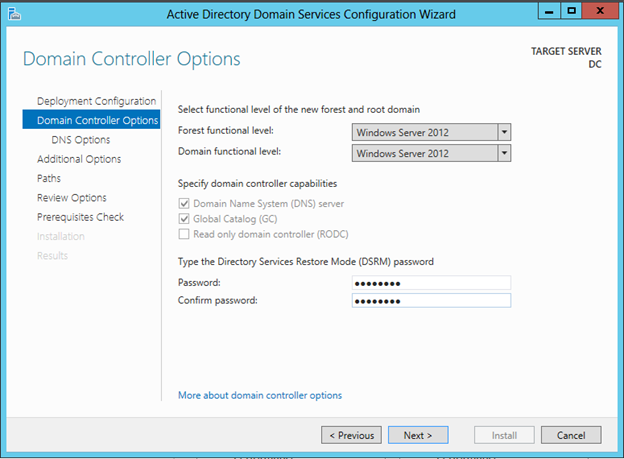
  • Next:
  • Next:
  • Next: 

    Though the training Kit suggest to separate active directory database and log file            
    locations but we can keep it as displayed by default in the wizard. 
  • Next (note that you can view the script it will generate if you like):
  •   Next – you will some warnings but all of them should pass successfully
  •  Install:
     The final installation and configuration will take approximately 5 minutes and will       
      automatically re-boot when done. Now that more services are running on DC, start-ups will take a little longer.
  • You can now login to your new domain:

  •  Create Kim_akers user :
    Go to Server Manager>Tools> Active Directory Users and Computers. 
Expand the domain, right click on Users: New User. 
Enter the info for the Kim_Akers account:

  • Next (set password to same one as given in the training kit, uncheck User must change password at next login and check Password never expires):
  • Next and Finish.
    Select the Users folder under the domain and double click on the Kim Akers account.     
    Switch the tab to Member Of and click the Add button:
    Add the following and then click on Check Names (to verify and resolve):
    Enterprise Admins; Domain Admins; Schema Admins


Click OK and OK.

  • Configuration for DC is complete.

H- Remaining Server Configurations

SQL-A Configuration
netdom join SQL-A /domain:contoso.com

SQL-B Configuration
netdom join SQL-B /domain:contoso.com
SQL-C Configuration
netdom join SQL-C /domain:contoso.com

SQL-D Configuration
netdom join SQL-D /domain:contoso.com
SQL-Core Configuration
netdom join SQL-Core /domain:contoso.com

  • Go ahead and login using CONTOSO\Kim_Akers on each of the  (click the arrow on the left to switch to a different user) and then power it down using shutdown /s /t 0
  • Re-boot and then login and double check on DC; Server Manager: Tools: Active Directory Users and Computers. Under Computers, you should now see all the nodes: SQL-A,SQL-B,SQL-B,SQL-D,SQL-Core:
  • The full configuration is now complete


Note:

Depending on your host resources, you can do the remaining vm's configurations one at a time or in parallel. Just realize that when you need to join a server to the domain, the DC needs to be running.

Part 2 Heads-up: If you have to get running fast, you might consider disabling Windows Firewall on all of your servers and enable ICMP IPv4 so ping can work.
Total hard drive space needed for this 70-462 Lab prior to installing SQL Server 2012 (six virtual machines ) :  51.4 GB

References

The following links were either linked directly in this post or were used  to consolidate the information needed for this deployment to be completed.
 Bruce Hendry - MCSA 70-462 Training Kit Preparation: Hyper-V Lab Environment Setup

Todd Kleinhans How to Build An Affordable SQL Server 2012 Lab 

https://toddkleinhans.wordpress.com/2013/04/11/how-to-build-an-affordable-sql-server-2012-lab/

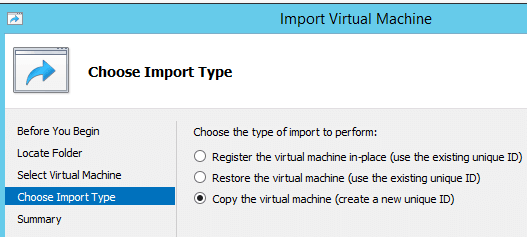
How to Import and Export Virtual Machine in Windows Hyper-V Server


Thursday, December 1, 2016

70-462 Training Kit Setup Preparation: Hyper-V - SQL server 2012 on Windows server 2012 R2 - Part I

Introduction:

Training Kit (Exam 70-462): Administering Microsoft SQL Server 2012 Databases, states that 6 machines are needed in order to complete the lessons and exercises. Though I consider it an overkill for a database administration certification (especially when one only needs 3 machines to try out all or most of Oracle High availability features RAC /DATA GUARD), I decided to go with a "Hyper V" virtualized environment and please the Book's authors :(.

For this purpose I always like to mix all the articles that gather the information I am looking for my task. In this particular case I have found one blog post explaining the Hyper V preparation and going further with the book's setup instruction including the network and domain configuration using Vmware. You got it! Since I have windows 10 that already includes a native Hyper V
We can just take the cheapest path to get to the book's content.

I will start with Bruce Hendry article then swith to Todd Kleinhans document.  I will sometime just insert the original content since the purpose here is to consolidate information as opposed to reinventing the wheel or ignore people's credit.

  1. Lab environment requirement & overview

     Host requirement:
a.     Hardware:
  • RAM : min 8 GB - actual 16 GB ( in case I am running all the machines plus any other memory consuming Application
  • DISK: min 80 GB - actual 500 GB (you never know ;) ) 
  • Internet connection
  • For a complete listing of the hardware requirements of the host machine, see page xviii in the training kit (but I wouldn't bother).
           b.     Software:
  •  Host:     OS -  Windows 10                Other -  Hyper V (builtin)
  • Guests:  OS - Windows server 2012 R2 iso   Other-   SQL server 2012 R2 iso, sysprep  

The lab environment machines and purposes is described by the following table:        

VMachine  Name  Purpose           Domain               OS                                              IP address  
DC                  Domain controller              CONTOSO.COM    Windows Server 2012 R2 (Full Install)       10.10.10.10
SQL-A            MSSQL Domain member   CONTOSO.COM    Windows Server 2012 R2 (Full Install)       10.10.10.20 
SQL-B            MSSQL Domain member   CONTOSO.COM    Windows Server 2012 R2 (Full Install)       10.10.10.30 
SQL-C            MSSQL Domain member   CONTOSO.COM    Windows Server 2012 R2 (Full Install)       10.10.10.40 
SQL-D            MSSQL Domain member   CONTOSO.COM    Windows Server 2012 R2 (Full Install)       10.10.10.50 
SQL-CORE     MSSQL Domain member   CONTOSO.COM    Windows Server 2012 R2 (Core Install)     10.10.10.60


1. Lab Topology
  c.  Enable Hyper-V Feature
For those who aren't seeing Hyper V in the application list (unlikely on windows 10) .You can enable Hyper-V, by entering Programs and Features / Turn On Windows features and select the checkbox for Hyper-V. 
Close the dialog with the OK button and allow Windows to enable the feature. It should not require a reboot

 Create Virtual Switch on Hyper V

 Virtual switch is necessary for the lab environment to work. This will configure an Internal virtual switch. If you already have a virtual switch, or you are familiar with configuring virtual switches, you can skip this section.
1.     Launch Hyper-V Manager.
2.     From the Actions pane, left click on Virtual Switch Manager… (you can also click left on the host Icon and select new –virtual switch)


3.     In the Virtual Switch Manager dialog, select New virtual network switch and Internal. Then click Create Virtual Switch.


4.     Enter Internal LAN for the name in Virtual Switch Properties. Use the name you want, just remember to use it for when creating the future Vms.
            
5.     Click OK. This will add the Internal LAN virtual switch. It will be available for use when we are setting up the Virtual Machines in later steps.
          

Lab Environment Setup Instructions

We can now focus on the Virtual machines that will host the different SQL servers and the domain controller  . We will be using differencing disks in Hyper-V which is the equivalent of snapshots for Vmware and Virtual box.
One single disk resulted from a Windows server 2012 full installation will be the template for all our VM's except the SQL-CORE since its installation is minimalist. 

 For more detailed information regarding this configuration, visit Hyper-V Virtual Machine (VM) Parent-Child Configuration Using Differencing Disks.

Create the Parent Virtual Machine (VM) & Virtual Hard Disk (VHD)

This will be the “template” that will be used to create your lab VM’s. Once we create it and get it configured correctly, we will remove the VM and just keep the VHD. The VHD will serve as the parent VHD for the subsequent children VHD’s.
  1. Launch Hyper-V Manager.
  2. Right click your host computer name and choose NewVirtual Machine to bring up the New Virtual Machine Wizard.
  1. If Before You Begin displays, click through to the next step.
  2. For Specify Name and Location, enter a name for your VM, e.g. 2012R2Parent. This VM will be discarded so the name does not matter .
  3. Choose a different value for Location or leave it as default. To follow the examples in this post, create a custom location off the root of your preferred drive, e.g. D:\Hyper-V.

  1. Leave Assign Memory at the default value of 512. You can leave Use Dynamic Memory for this virtual machine unchecked as we will be deleting this VM after setting up the VHD.
  2. For Configure Networking, choose the connection, Internal LAN. or any other name you have configured previously. 

  1. For Connect Virtual Hard Disk, choose Create a virtual hard disk and enter 2012R2Parent.vhdx for the name. Then enter a location. In the example below, we are using D:\Hyper-V\2012R2Parent\Virtual Hard Disks\. Leave the size at its default of 127 GB or change it to 30G since the size is dynamically allocated according to the size of the VM (OS+ software binaries+ database data).
    
  1. Choose Install an operating system from a boot CD/DVD-ROM for Installation Options. Enter the path to your Windows Server 2012 R2 Standard ISO file.
    1. Clicking Next will display the Summary section where you can verify your choices. Then click Finish.
    2. In Hyper-V Manager, right click on the VM you just created and choose Connect.

    1. Then click the green button on the menu to start the VM.
    1. Starting the Virtual Machine will launch Windows Server 2012 R2 setup. Follow the setup instructions until you come to the dialog that asks you to select the operating system.
    2. Choose Windows Server 2012 R2 standard (Server with GUI).
      1. After you have accepted the license terms and are prompted about the type of installation, choose Custom (advanced).
      1. Then choose Disk 0 Unallocated Space for the installation location. This should be the default selection.
      1. After you click Next the installation will begin. This can take some time.
      1. Once installation completes, the virtual machine will restart and you will be prompted to update your Administrator password.
      1.  And then login. In the upper left of the VMware Workstation window, you will see three buttons- this will issue a Ctrl+Alt+Delete to the virtual machine- otherwise if you just tried to do it from your keyboard, you would actually issue that command to the host computer which is not what you want:
        20- Once you have logged in, you will want to make any changes to the install that you want propagated to all your child virtual machines; this will be your virtual hard drive template. A few suggestions I incorporate into my environment before I start creating children from this parent Virtual Hard Drive:
        • Adjust date/time to use the correct time zone.
        • Enable Remote Desktop: I prefer logging into the virtual machines with Remote Desktop for a number or reasons.
        • Enable the required Framwork 3.5 for SQL server 2015 installation though Frawork 4 is already present.
        • Note : Activation is not needed for this Lab If your test environment duration is less than 120 days,

        .NET Framework 3.5 Features installation

         - You will need to install .NET Framework 3.5 as a requirement for SQL Server 2012. Although .NET 4.0 comes installed by default in Windows Server 2012, 3.5 does not.

        1- Server Manager: Manage: Add Roles and Features:

        2- Role-based or feature  installation :
        3- Keep going
        4- Select the .NET Framework 3.5 Features:

        5-  Finally, click the link to Specify an alternate source path:Use the path the CD/DVD is mapped to on the .iso file D:\Sources\SxS\ 


        ================================================================================================================
                      
           2. Hyper V propagation options

        A- Differencing : you are going to be using Microsoft’s System Preparation (Sysprep) tool to generalize your VHD installations; profile specific updates will not be propagated, e.g. adding an item to the taskbar. We will first be using Sysprep then create virtual hard disks copies using differencing option.
        B- Hyper V Export Import: This will be my input as the former method was already documented. I personally consider this one as simpler and less time consuming.Sysprep is also needed before exporting and importing the Vms.

           2.1  System Preparation Tool (Sysprep) 

         Microsoft’s System Preparation tool will generalize our VHD image before deploying multiple copies of it. This will be a common step for both methods (differencing and export import).
        You can read more about the details of Sysprep in Microsoft’s Sysprep Overview document at http://technet.microsoft.com/en-us/library/hh824816.aspx.
        1. Run Sysprep from an elevated command prompt to generalize installation, e.g. C:\Windows\System32\sysprep>sysprep.
        1. This will launch the System Preparation Tool dialog. Leave the System Cleanup Action selection as Enter System Out-of-Box Experience (OOBE).
        2. Select the Generalize checkbox and then Shutdown for Shutdown Options. The dialog should appear as follows:
        1. Choose OK.
        2. Sysprep will run and then shut down the virtual machine.
        Note: You can always just run this command as a batch script :
        %windir%\system32\sysprep\sysprep.exe /oobe /generalize /shutdown 

        A- Differencing Method

            Create Differencing Virtual Hard Drives

             Now it is time to remove the VM we used in the previous steps and create multiple copies of the parent VHD.
        1. Delete the virtual machine you used above. This will remove the virtual machine files and leave the virtual hard disk intact. In the example below, the 2012R2Parent VM is being deleted.
        1. When prompted, confirm that you want to delete the Virtual Machine.
        1. Navigate to your virtual hard drive file and set it as read-only. This is going to be your template (parent) Virtual Hard Drive file; it is important that it does not change. Setting the file to read-only will help prevent unintended updates.
        1. From the Hyper-V Manager interface, right click on your machine name and choose NewHard Disk…  from the menu.
        1. Select VHDX in the Choose Disk Format step.
        2. Select Differencing for the Choose Disk Type step.
        3. Specify Name and Location, use the name DC.vhdx and choose a location. We are using DC (Domain Controller) as the name for this VHD so that it will resemble the machine name in the training kit. In the example below, the location D:\Hyper-V\WSE2012R2Parent\Virtual Hard Disks\ is used to store the VHD files.
        1. For Configure Disk, enter the path to the parent VHD file that we created in the previous steps.
        1. Review the Summary for accuracy and click Finish if everything looks as expected.
        1. Now repeat steps 3 through 9 to create the Virtual Hard Drives listed below. Set the location for each VHD  to :   D:\Hyper-V\WSE2008R2Parent\Virtual Hard Disks\.                                                                 
        2. If you’ve followed the steps up to this point, you should have a directory with six new VHD files:
              These VHD names respect the naming conventions used in the training kit will make the exercises in the book easier to follow.

              Create Virtual Machines

        It is time to create the Virtual Machines using the existing VHD’s that were just created in the previous steps. This example uses the same location for the VM’s to keep them in close proximity to each other. This is merely a preference. Feel free to use what works for you.
        1. From the Hyper-V Manager interface, right click on your machine name and choose NewVirtual Machine…  from the menu.
        1. For Specify Name and Location, use the name DC. To use a custom location, place a check in the Store the virtual machine in a different location checkbox and enter the path in Location. The example below uses the Virtual Machines directory alongside the directory for the Virtual Hard Drive files, D:\Hyper-V\2012R2Parent\Virtual Machines\.
        1. Leave the default value of 1024 MB for Assign Memory and place a check in the Use Dynamic Memory for this virtual machine checkbox.
        1. For Configure Networking, choose the built-in connection, Internal LAN. Feel free to use your own if you are already configured one.
        1. Select Use an existing virtual hard disk for Connect Virtual Hard Disk. Enter or browse to the DC.vhdx Virtual Hard Drive file. In this example, the VHD file is located at D:\Hyper-V\2012R2Parent\Virtual Hard Disks\DC.vhdx.
        1. Review the Summary page for accuracy and choose Finish if everything looks as expected.

            7. Now repeat steps 1 through 6 to create the Virtual Machines folders listed below. The VM name should be matched up with the     similarly named VHD file [SQL-A ==== SQL-A.vhdx ]. 
            Note: Pay close attention while repeating these steps. Mismatching VM’s to VHD’s will likely cause confusion when working through          the training kit.

        The first time you start your new Virtual Machines it will launch the setup process. This is because the Sysprep tool left them in a generic state. Each VM will need to collect information from you, e.g. accept the license terms, set a password, etc. After setup starts services, installs devices and applies system settings, it will restart your Virtual Machine.And take you through the setup process.

        B - Hyper V import export Method (Skip option A)


        Import and export feature, allow us to seamlessly clone N number of virtual machines from an existing server in Hyper-V. However, It is important that you remember to use SYSPREP before you begin the export process. Otherwise, the duplication process may fail, or you may end up with a major network conflict due to having virtual machines that are completely identical.You could now guess why I jumped on this option instead of going through twice as more tasks to create virtual disks and their machines.
        Here's how it works in a nutshell

              Export Virtual Machine in Hyper-V

                  We will use the Parent VM created upper in this document as opposed to deleting it and export it to new location                       D:\Hyper-V\2012R2Parent\Export
        • Connect to your Hyper-V server from Hyper-V Manger -> Right click on your virtual machine and select the export option.

        • Specify Export Folder Path D:\Hyper-V\2012R2Parent\Export

        • Exported VM Files are as shown bellow                       

             Import Parent Virtual machine into new lab VMs

                 We can now import the VM into each of the following Lab machines DC,SQL-A,SQL-B,SQL-C.
                 Technically the original Parent VM can already be transformed to DC Machine as long as we made sure that our export           is valid ;).
        • Import Virtual Machine Menu Option

        • Select VM folder D:\Hyper-V\2012R2Parent\Export and the VM to Import

        • Choose Import Type : - Copy the virtual machine (Create new unique ID)
            
        • Choose destination location :   D:\Hyper-V\2012R2Parent\SQL-A 
        • Choose Hard Disk Location D:\Hyper-V\2012R2Parent\Virtual Hard Diks\SQL-A

        • Finish the Import :Review your machine configuration selection, and click on Finish to complete the import process.
        • change the name of the VM and related Virtual Hard disk :

        • Now repeat  the import steps to create the full list of VMs (except SQL-Core)
        1. SQL-A
        2. SQL-B
        3. SQL-C
        4. SQL-D
        5. DC :  rename the 2012Parent VM and its VHDX accordingly 

        • Sysprep Considerations :
        The first time you start your new Virtual Machines it will launch the setup process. This is because the Sysprep tool left them in a generic state. Each VM will need to collect information from you, e.g. accept the license terms, set a password, etc. After setup starts services, installs devices and applies system settings, it will restart your Virtual Machine.And take you through the setup process.

        2.2 Create SQL-CORE

        The 70-462 Training Kit requires one more Virtual Machine for the lab environment. This VM will use the Server Core Installation of Windows Server 2012 R2 Standard. As this is a unique installation, there is no need to leverage our existing VHD parent. We will install this as a new Virtual Machine with a new Virtual Hard Drive.
        1. In Hyper-V Manager, right click your host computer name and choose NewVirtual Machine to bring up the New Virtual Machine Wizard.
        2. For Specify Name and Location, enter SQL-CORE as the name for your VM. To follow this example, choose a custom Location and place the VM in the same directory as the other VM’s, e.g. D:\Hyper-V\2012R2Parent\Virtual Machines\.
        3. Leave the default value of 1024 MB for Assign Memory and place a check in the Use Dynamic Memory for this virtual machine checkbox.
        4. For Configure Networking, choose the built-in connection, Internal LAN.  
        5. For Connect Virtual Hard Disk, choose Create a virtual hard disk and enter SQL-CORE.vhdx for the name. Then enter a location.  e.g. D:\Hyper-V\2012R2Parent\Virtual Hard Disks\. Leave the size at its default of 127 GB.
        6. Choose Install an operating system from a boot CD/DVD-ROM for Installation Options. Enter the path to your Windows Server 2012 R2 standard ISO file.
        1. Clicking Next will display the Summary section where you can verify your choices. Then click Finish.
        2. In Hyper-V Manager, right click on the SQL-CORE VM you just created and choose Connect.
        3. Then click the green button on the menu to start the VM.
        4. Starting the Virtual Machine will launch Windows Server 2012 R2 setup. Choose Windows Server 2012 R2 Enterprise (Server Core Installation).
        5. After you have accepted the license terms and are prompted about the type of installation, choose Custom (advanced).
        6. Then choose Disk 0 Unallocated Space for the installation location. This should be the default selection.
        7. Click Next and installation will begin. This can take some time.
        8. After installation completes, the virtual machine will restart and you will be prompted to update your Administrator password.
        9. Enable remote desktop access in  "Server Manager\Local Server" panel
        10. Enable Framework 3.5  as follows                                                                                                                                     Login, launch PowerShell at command prompt and paste the following:
               Install-WindowsFeature NET-Framework-Core –Source D:\Sources\SxS\
          
                  You will probably see a warning- but you can ignore it for now.                                                                                                                                   Shutdown with shutdown /s /t 

        Validation & Final Steps

        When finished, if you have set it up following the examples in this tutorial, your lab specific Virtual Machine names will look like this in Hyper-V Manager:
        Your directory structure for the Virtual Machines will look like this if Method A is used (differencing):

        And your directory with the Virtual Hard Drive files will look like this: replace

        Note: The product key is not required as there is no need to activate Windows on the VM’s. Be sure to uncheck Automatically activate Windows when I’m online, unless you explicitly want to activate for some reason. As noted earlier, Microsoft recommends against activation for lab environments with a life expectancy of less than 120 days.

        We are now ready to start the Domain Controller configuration along with virtual machines'  network setting >hold tight :) we're almost there !

                                  *** PART 2 >>